Summary: In this Article, you’ll get to read about —
No brainer, ‘Gmail’ makes the process of attaching files in emails; pretty simple, straightforward and uncomplicated!
Clearly, while composing an email on Gmail, all it requires you to do is— ‘Drag and Drop’ the file to the email, and it will be uploaded and attached to the same in no time. However, last year in August 2020, Google reported some service disruptions related to Gmail where users complained that they were unable to attach files from their respective accounts.
Albeit, Google resolved the same in no time but, this incident is enough to highlight the fact that despite being one of the largest and biggest web-based email service providers in the world, Gmail is still not free of errors. It has its own share of issues that cause restrictions in the proper functioning of its emailing service.
In fact, from a worldwide user base of around 1.5 billion, there’s hardly anyone who can claim for not encountering Gmail issues.
In regard with this, you can read about: IMAP Issues in Gmail: Reasons and Fixes
Having said that, if you also time and again have encountered issues with your Gmail account and most recently while using attachments in Gmail then, you’re not alone my friend!
Many of the Gmail users still found that the Attach files option in Gmail doesn’t always work and when they try to attach a file, they receive this occasional error message – “Attachment failed. This may be due to a proxy or firewall.”
So, if this is what you also have received then, we suggest you breathe a sigh of relief, because here’s the list of 10 potential solutions to fix ‘Gmail Attachment Errors.’ Have a look—
| Be Within the Size Limit |
| Disable Add-ons, Extensions and Grant Permissions to Gmail |
| Update the Flash Plug-in to the Latest Version |
| Go Basic: Switch from Advanced to Basic Gmail |
| Turn the Proxy Server for LAN Settings Off |
| Turn off Security Programs: Windows and Antivirus Firewalls |
| Clear Cache / Update the Web Browser |
| Open Gmail Account in Alternate Web Browser |
| Disable HTTPS for the Time Beinf |
| Seek Alternatives Like Third-Party Desktop Email Client |
Fix Gmail Attachment Errors With These Solutions
With these listed solutions, you’ll be able to fix this particular problem of can’t attach files in Gmail. That’s why, in the below section, we’ve discussed these solutions one-by-one in detail. So, if you need assistance for trying them out then, continue your reading—
Solution 1: Be Within the Size Limit
The very first way to deal with this problem is to ensure that you remain within the maximum attachment size limit. You can call it as one of the major drawbacks of Gmail that its total attachment size is restricted to only 25 MB, including all files attached.
So, if the attachment size goes beyond what is directed then, Gmail instead of adding an attachment to the email, will automatically upload the file to Google Drive. Basically, Gmail adds a link to the file in place of attaching the actual file.
In addition to the same, it is worth noting that Gmail for some security reasons won’t allow executable files that end in .EXE format. Therefore, make sure you use either of the following supported browsers (Chrome, Firefox, Microsoft Edge, and Safari) for the same to not encounter ‘Gmail Attachment Not Working’ issue any further!
Solution 2: Disable Add-Ons, Extensions and Grant Permissions to Gmail
Another reason why there were errors attaching your file(s) in Gmail is most probably your ‘Browser Extensions and Permissions.’
So, first considering that your respective browser’s extensions could be interfering with Gmail functionality and causing the problem with the attachments, we suggest you to open ‘Incognito Mode’ or private browsing window. There, log in to your Gmail account to check if now you can attach files in emails or not!
Well, in case if yes then, exit Incognito mode and disable / remove all (especially ad blockers) the add-ons and extensions involved in your browser on a temporary basis.

Besides removing browser extensions, let’s tell you that Gmail also requires storage permissions to access as well as attach files from your respective device be it computer or smartphone. So, based on that, there can be two scenarios—
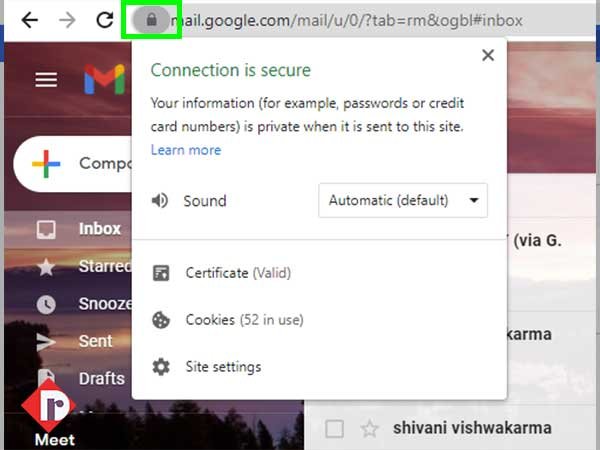
- If you can’t attach files in Gmail-web-client then, make sure whether you’ve granted all the permissions to Gmail web-client to access your emails, what you simply need to do is click on the “Padlock Icon” in the address bar.
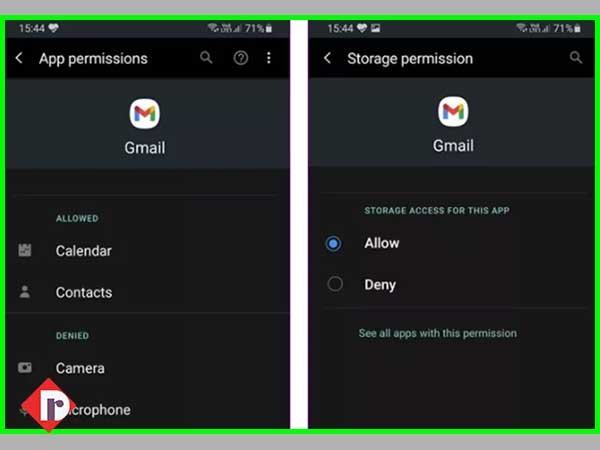
- If you can’t attach files in Gmail Android smartphone then, make sure you’ve set “Allow” for ‘Storage Permission’ to let Gmail access files from your respective android phone and attach the required one without any error. For that, you need to simply navigate from “Settings > Apps > Gmail” to “Permissions” and then to “Storage.”
After doing so, check if the problem of attaching files in Gmail has been resolved or not yet! Well, for the latter case, you can try out the next solution.
Solution 3: Update the Flash Plug-in to the Latest Version
The next best solution to try when you’re unable to attach files to Gmail and in turn getting error messages while uploading attachments— is to check and compare the Adobe Flash version (that you’re using). This is because, the chances of receiving “Gmail is unable to attach files” error, increases if an older version of the Flash plug-in is installed on your computer. Wondering why? Well, the reason is simply that the old version of Adobe Flash is no longer supported by Gmail’s attachment uploader service/feature.
So, simply visit the Adobe Flash Player page and there, if you find out that you’re not using the latest Flash version then, you must update the Adobe Flash via following these steps—
- Step 1: Using your preferred web browser, visit/open the official “Adobe Flash Player” website.
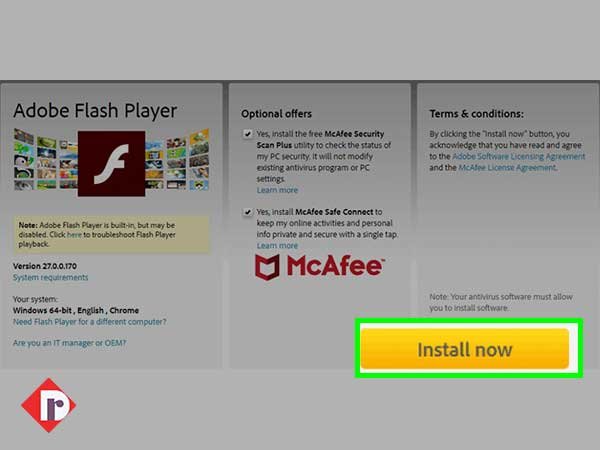
- Step 2: On reaching there, what you’ve to first do is remove the tick-marks from “Optional Offers” checkboxes simply in case you don’t want to download any extra software.
- Step 3: Upon doing so, click on the “Install Now” button to let the Flash Player installer file downloads and save on your respective computer.
- Step 4: After that, open the “Adobe Flash Player Installer” window to click on the downloaded Adobe Flash file. In doing so, the installation of the Adobe Flash Player on your computer begins and this process finishes in just a few minutes.
- Step 5: Once the Adobe Flash Player is installed, check whether the ‘Flash’ option is enabled in your regular-used web browser (for instance, in Chrome) or not. Well, in case, it is not enabled then, what you’ve to do is enable the same via following these further steps—
- Open Chrome and click on its “Customize Google Chrome” button.
- Then, select the “Settings” option.
- On the settings page that opens, you’ve to scroll down and select the “Advanced” option to expand it.
- From the expanded Advanced options, click on the “Site Settings” followed by “Flash.” Otherwise, you can also use the search feature to look for the “Flash” option.
- After doing so, a list of options will appear on the screen and from them; you’ve to simply toggle the switch to “Ask First” for allowing sites to run the “Flash” option.

- In doing so, you’ll finally be able to use the latest version of Flash that you’ve recently installed to work with ‘Gmail’s Attachment Uploader’ without any error.
However, if not and you’re still encountering the given error then, you should definitely consider the other solutions of the list.
Solution 4: Go Basic: Switch from Advanced to Basic Gmail
Maybe your Gmail account is running on a slower internet connection and that’s why you aren’t able to attach files in Gmail. In such a scenario, what should be done is – check your internet connection and switch from Advanced to basic Gmail that is mainly designed for slower internet connections only as it removes all sorts of advanced features like Gmail categories, images, and so on.
Yes, those who don’t know, Gmail has an option that allow you to switch from the advanced attachment uploader to a basic attachment uploader and this can be done via following these 3 simple steps—
- Step 1: Open your Gmail account by signing in using your login credentials and then, click on the ‘Gear icon’ which you’ll find in the upper right corner of your Gmail account screen.
- Step 2: Then, click on the “See all settings” option to choose the “Mail Settings” option following that.
- Step 3: Now, inside the ‘General’ tab of Mail Settings page, you’ve to click the “Attachments” option for simply switching from “Advanced attachment features to Basic attachment features.”
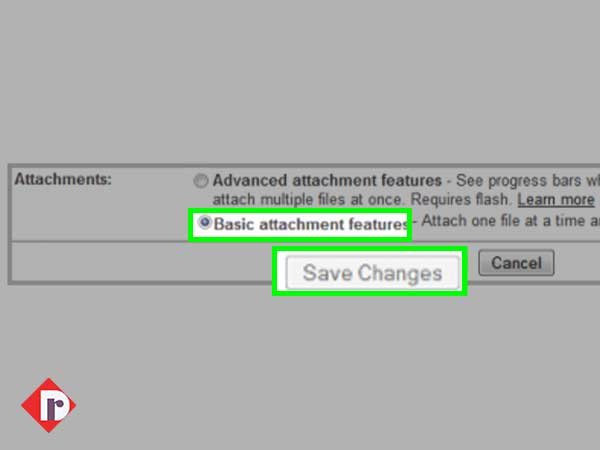
After switching the Gmail’s attachment feature from advanced to basic, you can check whether now you’re able to attach files from your Gmail account and get rid of the “Gmail Won’t Attach Files” error that you have been encountering or not!
Solution 5: Turn the Proxy Server for LAN Settings Off
Usually, “Gmail attachment failed error” occur due to a proxy server and this is what clearly indicated in the Attachment failed error message. Thus, switching the web browser proxy might help you successfully fix the error.
So, it is recommended that you get assured whether the web browser proxy is “ON” for your LAN settings or not and if it is on then, here’s how you can disable the web browser proxy server for LAN settings—
- Step 1: Begin by pressing the “Windows Logo Key” on your keyboard. In doing so, the Windows menu will open in front of you. Or simply, you can click the “Cortana” button from the Windows taskbar to open the menu.
- Step 2: Inside the same, what you’ve to do is select the “Internet Properties” option.
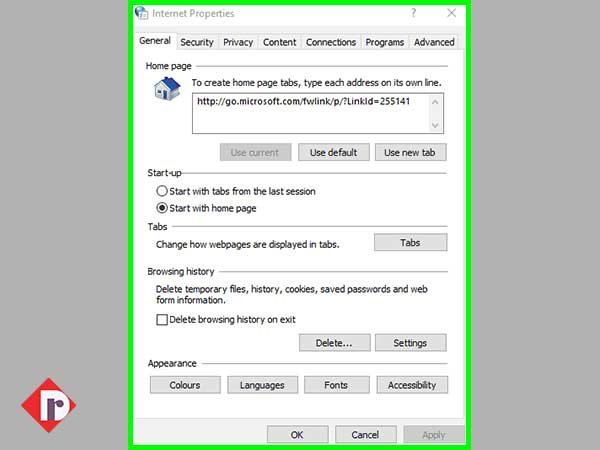
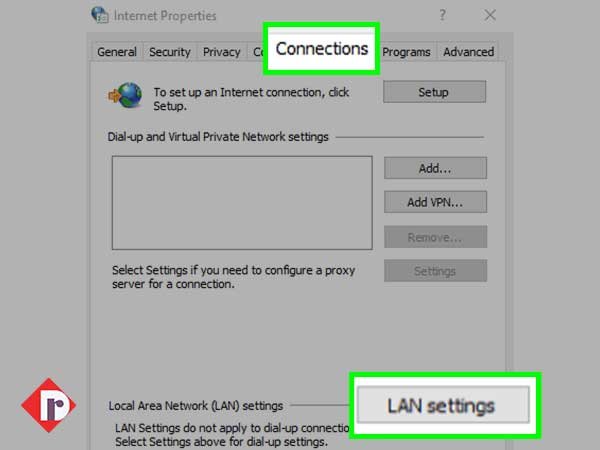
- Step 3: In doing so, a new window will appear on the screen and there, click the “Connections” tab. Next, you’ve to press the “LAN Settings” button.
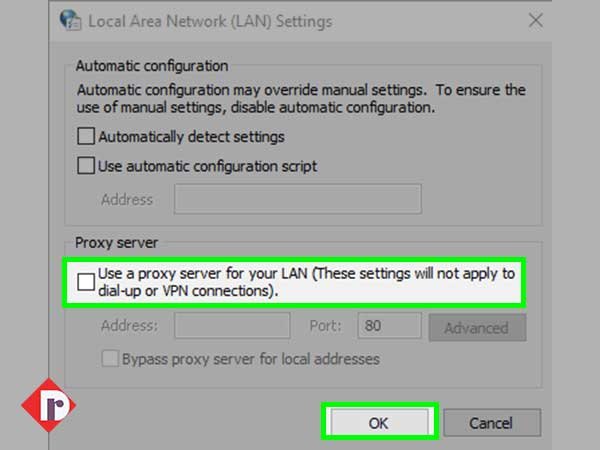
- Step 4: Now, deselect the “Use a proxy server for your LAN setting” option.
- Step 5: Once you do so, hit the “OK” button in the end to close the process.
Solution 6: Turn off Security Programs: Windows and Antivirus Firewalls
If Flash is blocked on the computer due to Windows and Antivirus Firewalls security settings then, you’re likely to encounter issues when attaching files in Gmail. So, it is worth noting that not just the proxy server, a firewall setting might also be one of the reasons why you’ve encountered “problem attaching files in Gmail.”
However, worry not! By switching Firewalls, you can stop the same from creating issues in Gmail attachments. So, simply have a look on how you can temporarily switch both Windows and Antivirus Firewalls off—
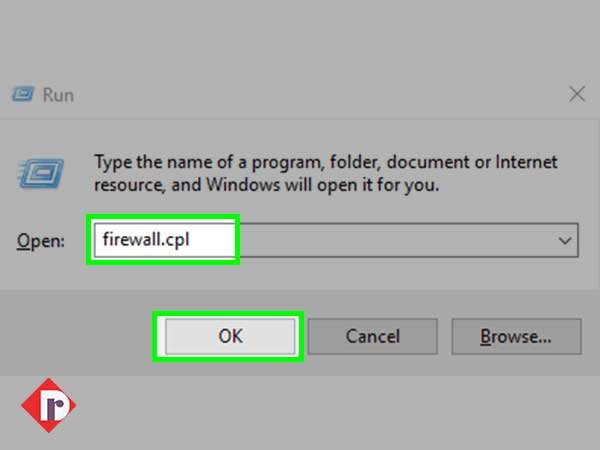
- Step 1: Press the “Windows + R” hotkeys together to open the “Windows Run Dialog-Box.”
- Step 2: Then, inside the same, enter “firewall.cpl” and hit the “OK” button.
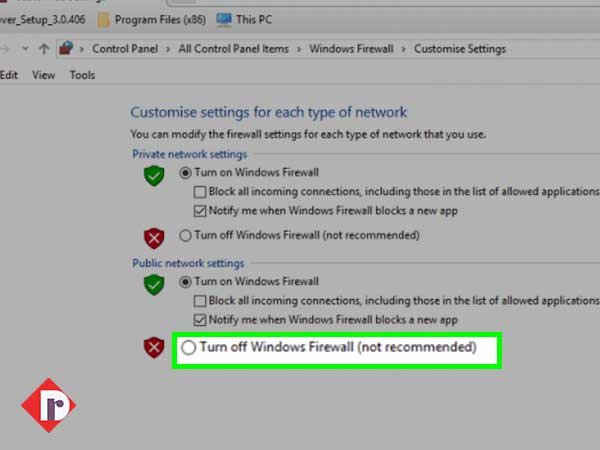
- Step 3: Next, what you’ve to do is turn on the option of ‘Windows Firewall’ either “on” or “off.” In doing so, the new tab of “Customize Settings” will open in front of you.
- Step 4: Once the “Customize Settings” tab opens, you’ve to simply select both the “Turn off Windows Firewall” options that you see there.
- Step 5: Upon doing so, just hit the “OK” button and close the tab.
Apart from that, do you know even the antivirus software that you’ve installed on your device has its own firewall? If not then, now you know! So, the point of telling you this is simply that you need to turn off the firewall of your antivirus software as well. For that, open your installed antivirus software and right-click on its “Notification area” icon to select the “Disable/Turn off” option.
In this manner, you can get rid of “can’t attach PDFs and files to Gmail” as there remains no interference from Windows and Antivirus firewalls.
Solution 7: Clear Cache / Update the Web Browser
Most likely ‘Gmail attachment error’ occurs in browsers that are either full of cache or outdated.
Basically, if you’re using an outdated version of your web browser to attach files on your Gmail account then, chances of experiencing Gmail attachment failed error increases. Similarly, if your browser contains a lot of cache, browsing history and cookies then, also you encounter the same situation.
So, it is suggested that you can try clearing the cache cookies and browsing history of your browser. For that, go to the browser’s settings page, clear the entire browsing data and then, check if you’re now able to attach files in Gmail or not!
[Note: If you’re encountering ‘Can’t Attach Files in Gmail Android’ then, in this particular case, consider clearing your Gmail App’s cache.]
At the same time, regularly check and update your web browser to its latest version for not getting an error while attaching files in Gmail.
In regards to the same, let’s tell you that you can check for updates in your browser’s settings itself. Or else, depending on your preferred web browser, you can consider visiting the developer website to find out whether you need to update your web browser to its latest version or not!
However, if you’re a regular user of most commonly used Google Chrome web browser then, look at the steps for updating the same—
- Step 1: To update your Chrome browser, begin the process by clicking on the “Customize Google Chrome” button. In doing so, your Chrome browser’s menu will expand in front of you.
- Step 2: From the expanded menu, you’ve to select the “Help” option followed by clicking the “About Google Chrome” option.
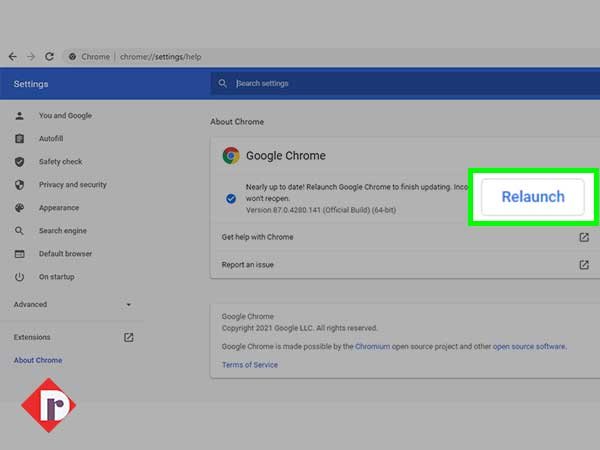
Now, on the “About Google Chrome” window that opens, if there’s an update available then, you’ll be informed about the same. However, even if an update is available, you’ve to do nothing because the browser will automatically download the latest version of itself.
- Step 3: Upon updating the browser, you’ll be asked to “Relaunch” your browser to finish the updating process. So, just restart your Chrome browser simply by clicking on the ‘Relaunch’ button.
Solution 8: Open Gmail Account in an Alternate Web Browser
Another effective solution is to try switching from Google Chrome web browser to alternate browsers. This should be considered to check if Gmail’s file attachment works fine on an alternate web browser to help you to resolve the “can’t open attachments in Gmail” / “can’t upload attachments in Gmail” issue or not.
So, if you consider trying this solution then, let us tell you that Gmail supports the following browsers—“Chrome, Internet Explorer, Safari, Firefox, and Microsoft Edge.” From these following web browsers, you can use any one for accessing Gmail.
Solution 9: Disable HTTPS for the Time Being
Generally, it is not recommended that you disable ‘HTTPS’ but, you can consider it as an effective solution to fix Gmail attachment error, in case none of the solutions (we’ve mentioned above) works in your favor. So, without thinking much, disable HTTPS via executing these steps—
- Step 1: First, login in to your Gmail account from www.gmail.com.
- Step 2: Then, navigate your Gmail account’s “General” tab from the “Settings” option.
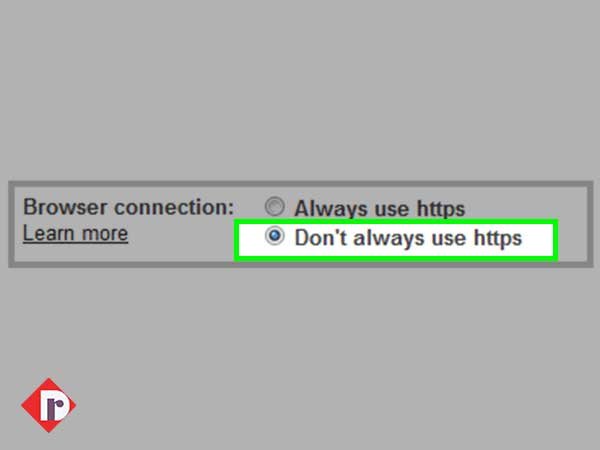
- Step 3: Inside the general tab, you need to click on the “Browser Connection” option
- Step 4: After doing so, you just need to switch from the “Always use https” to the “Don’t always use https” option.
Solution 10: Seek Alternatives like Desktop Email Client
Last solution on the list suggests you to try a desktop email client because if you’re assuming that using Gmail’s webmail client is the only option you have then, you’re highly mistaken!
You can also use any of the desktop email clients from the following options— “Mail bird, Thunderbird and Microsoft Outlook.” For that, you have to simply add Gmail in your selected email client option.
And, let’s tell you that, this alternative option of setting up Gmail in a ‘third-party desktop email client’ helps you to not only access your Gmail account but also to attach files in Gmail without any sort of inconvenience. However, for that, you’ll need the following Gmail Server Settings—
| ‘IMAP/POP’ & ‘SMTP’ Server Settings of Gmail Service | |
| Incoming & Outgoing IMAP Server Settings | Incoming & Outgoing POP3 Server Settings |
| Incoming Server – imap.gmail.com | Incoming Server – pop.gmail.com |
| Outgoing Server – smtp.gmail.com | Outgoing Server – smtp.gmail.com |
| Incoming Server Port – 993 | Incoming Server Port – 995 |
| Requires SSL Encryption – Yes | Requires SSL Encryption – Yes |
| Requires TLS Encryption – Yes (If applicable) | Requires TLS Encryption – Yes (If applicable) |
| Outgoing Server Ports – 465 with (SSL) and 587 with (TLS) | Outgoing Server Ports – 465 with (SSL) and 587 with (TLS) |
| Requires Authentication – Yes | Requires Authentication – Yes |
| Email Address – Your Gmail Account’s Email ID | Email Address – Your Gmail Account’s Email ID |
| Password – Your Current Gmail Account Password that you use to log in. | Password – Your Current Gmail Account Password that you use to log in. |
Bottom Line
That’s it! These are a couple of solutions for fixing the “Gmail Attachment Not Working” error. Hopefully, now you can easily use them to get rid of the “Gmail Attachment Not Working” error whenever encountered. However, in case you need further assistance and want to contact Google to report the issue then, you can straightforwardly do so with the help of this Gmail support contact form.