Summary: In this Article, you’ll get to read about —

It is possible to export Mac Outlook 2016 data to PST by applying a manual method. We have explained the process in 4 steps. However, we also summarized how you can quickly convert Mac Outlook 2016 info to Outlook importable PST format using OLM to PST converter.
Microsoft Outlook is widely known for being a user-friendly email client application. It offers features that set it apart from other email clients. It facilitates the user with proper management of their emails, calendars, contacts, etc.
The email client is now available on both Mac and Windows operating systems. But, the features of both operating systems are identical, yet with some significant differences. The biggest difference could be the different file formats both operating systems support to store mailbox input.
Mac Outlook, for example, saves all its data in OLM format, whereas Windows Outlook stores data in PST format. Therefore, if a user wants to access an OLM file on a Windows platform, he cannot view it before the item is converted to PST format. However, this is not the case with Outlook for Mac, as it enables users to import PST files of any edition to its interface.
However, Microsoft does not give the option to transport info in PST format in Outlook for Mac, but it can import PST files to Outlook for Mac.
How to Export Mac Outlook to PST file?
There are different methods to dump Mac Outlook data into Windows Outlook-supported PST format. But, what method could be the best and most reliable to export Mac Outlook to a PST file? Here, we are going to explain two different methods that will greatly benefit you in terms of input accuracy and security.
Manual method to export Mac Outlook 2016 to PST format
Users can manually transport Outlook 2016 Mac data to PST including messages, calendars, contacts, and other items. But, first, these items need to be exported to the archive item. As it is a lengthy procedure, we have divided it into phases. You can follow the steps given below:
Step 1: Export Mac Outlook OLM Data
- Open Outlook for Mac on your laptop.
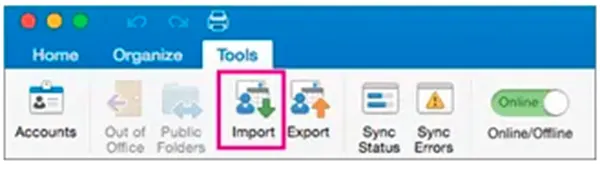
- Click on the ‘Tools’ tab, and then click ‘Export’.

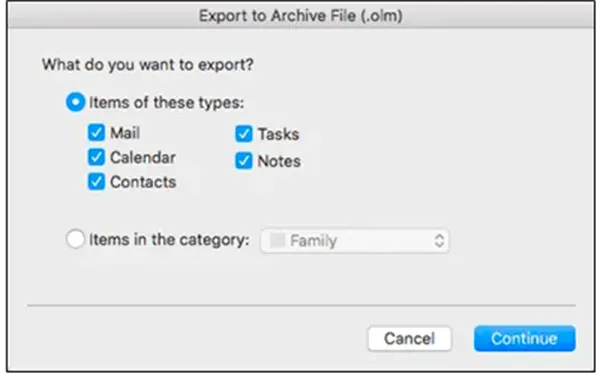
- In the Window Export to Archive File (.olm), select items under ‘What do you want to export?’, and then click ‘Continue’.
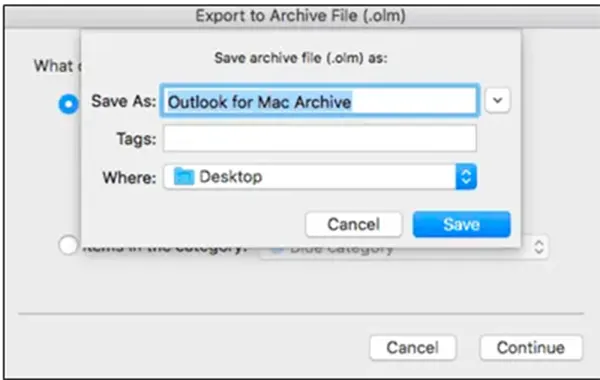
- A new dialog box will appear, titled ‘Save archive file (.olm) as:’ specify the location in the ‘Where:’ section, and click ‘Save’.
- Once Outlook completes the exporting of selected data, click ‘Finish’.
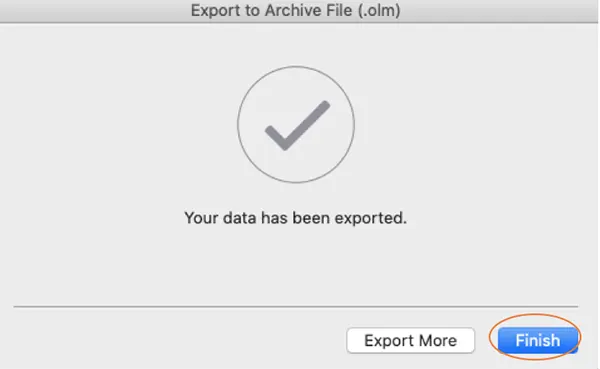
The selected OLM files will be saved as an ‘archive.olm’ file to your desired location.
Step 2: Configure Gmail account in Mac Outlook
Note: Before configuring your Gmail account in Mac Outlook, you need to ensure that IMAP settings are enabled for your Gmail account.
- Open your Mac Outlook application, and click on Outlook. See below and select ‘Preferences’.
- A new window of ‘Outlook Preferences’ will be displayed. Now, click on ‘Accounts’ under ‘Personal Settings’.

- In the Accounts window, see at the bottom-left, and click on the plus (+) sign. From the drop-down, click ‘E-mail’.
You will be prompted to enter your Gmail account information. Enter your email account, fill in the password, and then click Add Account.
- It will add your Gmail account to your Outlook account.
Step 3: Import Mac Outlook OLM data to Gmail
- In Mac Outlook 2016, right-click the newly added Gmail folder, and from the list, select New Folder.
- Rename the new folder, and then click File, and then import.
- Now, right-click the Mac Outlook mailbox again, select the mailbox to dump, and click “Copy Folder”.
- Search for the Gmail folder that you created, and Paste the Mac Outlook folder into it.
- This will ‘Copy’ all your Mac Outlook info to your Gmail account.
To continue with the procedure, open Outlook for Windows and configure your Gmail account that you added with Mac Outlook in the second step of the process.
Step 4: Export OLM data from Gmail to Outlook PST
- Open Windows Outlook, and configure the same Gmail IMAP account.
- In your Windows Outlook, click on the File, and from the list, select Open & Export and choose Import/Export from the item menu.

- It will take you to the ‘Import and Export Wizard’ window and from there, select ‘Export to a File’, and click ‘Next’.

- Choose ‘Outlook Data File (.pst)’ from Export to a document dialog box, and click ‘Next’.

- From the list of folders, select the Gmail folder as it contains OLM file data and go ‘Next’.
- Browse the location to save your Outlook data file (.pst), and click ‘Finish’ to complete the procedure.
This will successfully export your OLM data to a PST file.
Do You Know?
Over 95% of large companies use Microsoft’s exchange server and Outlook for Email management.
Why is the Manual Method Not Easy to Manage?
The manual method can transport Mac Outlook OLM data to PST. However, there is a good chance that you might fail to complete the procedure. The process requires you to have a lot of technical proficiency to execute it successfully.
There are other drawbacks to the manual procedure:
- You are required to configure a Gmail account.
- It can consume a lot of time as it is a lengthy process.
- It’s hard to maintain the original folder hierarchy with the manual process.
- You cannot transfer large Mac Outlook OLM input to PST with the manual method.
- Due to a cross-platform conversion, there is a high chance of losing info.
Effortlessly export Mac Outlook 2016 OLM data to PST with an Automated Solution
The manual method we discussed above has several limitations. To overcome these constraints, users should look for software-based solutions like Stellar Converter for OLM, which is a specialized tool to convert OLM files to PST accurately and quickly. The third-party tool neither requires you to configure a Gmail account, nor you to have the technical expertise to use the tool.
Moreover, Stellar Converter for OLM offers various features like preview, browse & find OLM mailbox, multiple formats to save converted OLM files, generate log reports, etc. The software does not take time to convert OLM files to PST format. All it takes is three simple steps: 1) Select OLM files, 2) Convert, and 3) Preview and save.
The other distinctions the OLM to PST converter has over the manual method are that it does not require technical assistance to operate the user’s interface, and converts the OLM to PST without disturbing the mailbox data.
Conclusion
It is not easy to export Mac Outlook 2016 OLM info to PST. Users may face difficulties migrating from Outlook for Mac to Windows Outlook. In the article above, we explained the manual method and software-based solution to transport Outlook 2016 Mac OLM files to PST.
However, the manual method has some difficulties for normal users, as it requires proficient technical knowledge. Moreover, the process is quite lengthy and there are chances that you may fail to complete the process. Therefore, to avoid failure and save time, it is advisable to choose Stellar Converter for OLM to export Mac Outlook 2016 OLM data into Outlook.
The software tool specializes in converting OLM to PST and facilitates users in migrating Mac Outlook input to Windows Outlook in a quick time and with 100% accuracy.