
Summary: In this Article, you’ll get to read about —
Microsoft Office is a suite of software that includes Microsoft Excel, Word, PowerPoint, Access, OneNote, Microsoft Word, and more flagship products. It enjoys a world-wide user base of over 1.5 billion and has become a vital application for driving productivity at home and in the workplace.
So, it requires no explanation why one needs to have it on their respective device. But, for that, one needs to first purchase a product key for Microsoft Office then, download and install its files directly from Microsoft.
Albeit, you’ve the option to download, install and activate Microsoft Office (365, 2019, 2016) for free, but that’s an illegal way of doing it! We don’t support the illegitimate way and thus, if you’re looking for the process of how to download and install Microsoft Office in the legal manner then, you can continue reading this blog.
Having said that, if you own a product key for Microsoft Office then, it’s really simple to download the installation files directly from Microsoft!
Wondering how? Then, let’s directly move onto learn how to download and install Microsoft Office 365 or Office 2016| 2019 version on Windows and Mac –laptop, computer, or tablet, with this guide! It includes a total of three sections where;
| In the first section, we’ve explained how those who haven’t yet obtained legal Microsoft Office installation files can do so via two popular ways! |
| In the second section, we’ve explained how Windows users can install Microsoft Office on their PC, laptop or tablet. |
| In the third section, we’ve explained how Mac users can install Microsoft Office on their PC, Laptop or tablet. |
Section 1: How to Obtain Legal Microsoft Office Installation Files?
To legally obtain Microsoft Office Installation files, you’ve a total of following two popular ways—
Way 1: Purchase Microsoft Office Subscription
Well, in this case, if you’ve an active Office 365 subscription then, you’re entitled to download and install the full versions of most of the popular Microsoft Office applications such as Word, Excel, and PowerPoint. So, execute these steps for purchasing Microsoft Office subscription—
[Note: In case, you’re from those, who’ve already purchased the Microsoft Office subscription for your computer system then, simply skip this section and move onto the sections ahead that contain steps for installing Microsoft Office on Windows and Mac, respectively.]
- Step 1: First of all, reach onto the Microsoft product page by entering this “https://products.office.com/” link on your respective computer’s web browser and clicking the ‘Enter’ button.
- Step 2: There on the Microsoft Office Product page, click on the black-colored ‘Buy Office 365’ button which is located there at the upper-right side of the page. Yours, this action will take you further on to the second Page of Microsoft Office Product.
- Step 3: On the same, you’ve to decide on an ‘Office 365 option’ that you can buy out of the following listed four flavors of Office 365 subscription—
| Office 365 Home | Office 365 Personal | Office Home & Student |
| It costs $99.99/year | It costs $69.99/year | It costs $149.99 (one-time charge) |
| It comes with five computer installations & five smartphone | tablet installations. | It comes with one computer installation & one smartphone |tablet installation. | It comes with Word, PowerPoint, Excel, and OneNote. |
| It offers up to five terabytes of online cloud storage. | It offers a terabyte of online cloud storage. | —— |
Also, Microsoft users consider reading about the— Ways To Get Rid of ‘Not Implemented’ Error In Microsoft Outlook?” and 11 Quick Work Arounds to Try When Outlook Won’t Let You Sign-In!
- Step 4: Once you’re done with your selection, click on the green-colored ‘Buy Now’ button, which you’ll find below the name of the office subscription option that you’ve just selected.
- Step 5: After doing so, click on the blue-colored ‘Checkout’ button from the far-right side of the same page.
- Step 6: Now, regardless of the fact whether you’re already signed in to your Microsoft account or not; you need to sign in to your Microsoft account when prompted, by entering your Microsoft account’s sign-in details (email address and password) and simply, clicking the ‘Sign-in’ button.
- Step 7: In the end, just click on the ‘Place Order’ button which is there on the right side of the page and this way, you’ll be able to successfully purchase your Office 365 subscription for a year.
[Note: This is worth noting two things. Firstly, you need not have to pay again the following year, if you’ve bought the Student version. Secondly, you’ll need to provide your payment information before you can place your order, in case you don’t have a credit, debit, or PayPal option on file for your account.]
Way 2: Get It From a License Key
As per this way, if you’ve purchased a new system then, the same will come with a copy of Microsoft Office, and most of the time, it’s already pre-installed. However, in case if not the, you should have been provided with a product key from the manufacturer, which you can simply use to download and install Office from Microsoft.
Now, you’re good to go to download and install Microsoft Office on either of your Windows or Mac computer system after meeting the following system requirements—
- Before you do anything else, make sure that no other program is running on your computer. Otherwise, it might cause some malfunctions and, in turn, damage your computer.
- Next, update your respective Chrome or Safari browser because Microsoft 365, Office 2019, Office 2016 and its other versions are designed to work effectively with the current version of the Safari and Chrome browsers
- Other requirements that needed to be fulfilled, include:
- 500 MHz or faster processor
- 256 MB or more RAM memory
- 3 GB or larger available hard disk space
- 1024×578 display resolution
- Windows XP SP3 (32-bit), Windows Vista SP1 (32 or 64-bit), Windows Server 2003 R2 (32 or 64-bit) with MS XML 6.0, Windows Server 2008 or later (32 or 64-bit), Windows 7 (32 or 64-bit), Windows Terminal Server & Windows on Windows applications are supported, as well.
Section 2: How to Download and Install Office on Windows?
Execute these steps for downloading and installing Microsoft Office on Windows Computer—
- Step 1: First of all, visit this “http://www.office.com/myaccount/” link on your respective Windows-computer’s web browser. In doing so, ‘Microsoft Sign-in Page’ will open in front of you.
- Step 2: There, enter your account’s sign-in details to sign in with your Microsoft account to reach onto its official page (basically the page with your Office purchase.)

- Step 3: Then, you’ve to enter your product key or the Microsoft Office activation code (that comes with any physical packaging you receive when you buy the software at a retail store or is included in an email if you ordered the same digitally).
[Note: The product key you enter lets Microsoft know that the software was purchased legally by you.]
- Step 4: In addition, you need to select your ‘Country or region and language,’ as well.
- Step 5: Next, click on the ‘Install’ button, which is an orange button located right below your subscription name.

- Step 6: Again, in continuation, click on the ‘Install’ button to begin the downloading of your Office setup file.
[Note: In case, if you purchased the Student version of Microsoft Office then, you can simply skip this step.]
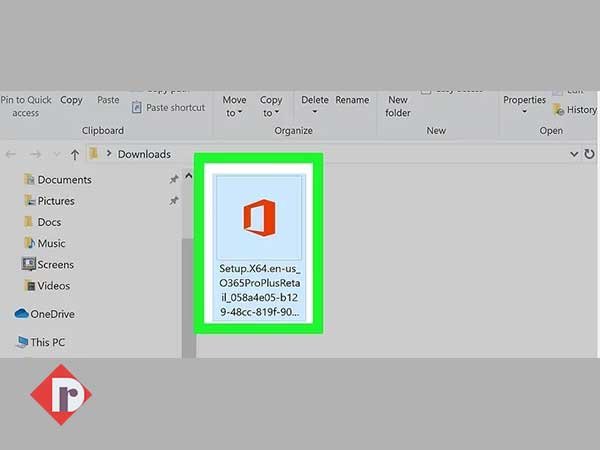
- Step 7: Once the Office setup file gets downloaded completely, locate it in your computer’s default download location and perform a ‘Double-click’ action on the same.
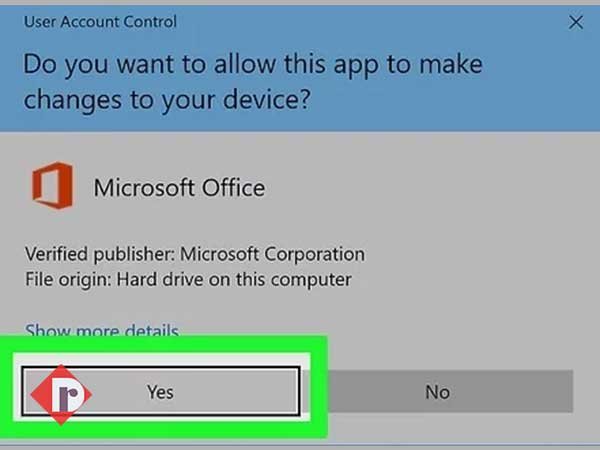
- Step 8: After doing so, click on the ‘Yes’ option (when prompted).
- Step 9: Next, depending on your browser, click Setup (in Chrome), click Run (in Edge or Internet Explorer) and Save File (in Firefox) to run the setup file to begin the installation of Microsoft Office on your respective Windows computer system.
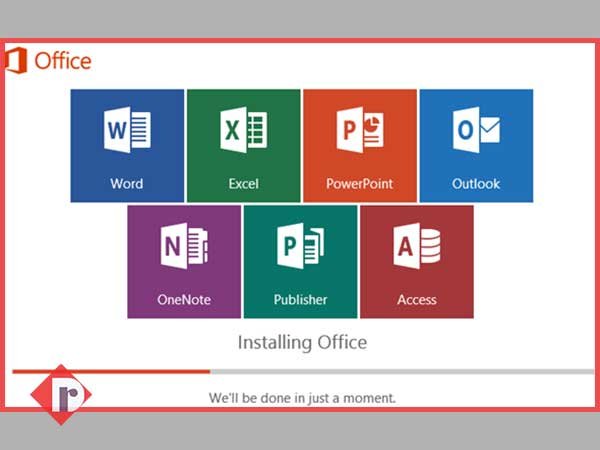
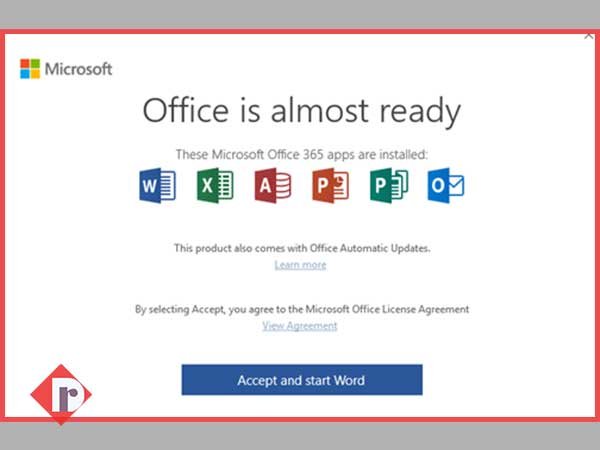
- Step 10: Now, you’ve to just wait patiently for several minutes until the installation of Microsoft Office finishes. And, right when the installation finished, you see this phrase “You’re all set! Office is installed now.”
- Step 11: In the end, an animation will play to show you where to find Microsoft Office applications on your Windows computer, and simultaneously you’ll be prompted to end the installation process by following the instructions in the window, for instance –click on ‘Start > All Apps (to see where your apps are) > to select Close.’

Congratulations! Your Microsoft Office (365, 2019 or 2016) programs have now been installed on your respective Windows 10 computer system, and you’re good to go, begin using these programs without delay!
Section 3: How to Download and Install Office on Mac?
Execute these steps for downloading and installing Microsoft Office on Mac Computer—
- Step 1: Firstly, go to “http://www.office.com/myaccount/” using the Safari browser on your Mac computer.
- Step 2: On reaching there, enter your Microsoft account’s sign-in details. In doing so, a page with your Office purchase will open in front of you.
- Step 3: There, you’ve to enter your product key/ the Microsoft Office activation code that you physically receive when you buy the software at a retail store or get in mail if you’ve ordered the same, online).
[Note: The product key/ the Microsoft Office activation code that you enter, will let Microsoft know that you’ve purchased the software legally.]
- Step 4: Next, you have to select your ‘Country/ region and language’ also.
- Step 5: After entering this aforementioned information, click on the orange-colored ‘Install’ button which is right in front of your subscription package name.

- Step 6: Then, to begin the downloading of your Microsoft Office setup file, again click on the ‘Install’ button. However, note that you can skip this particular step if you’ve purchased the Student version of Microsoft Office.

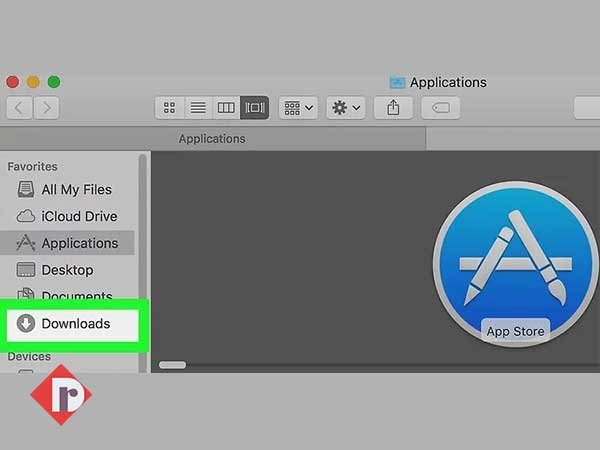
- Step 7: Next, you’ve to open ‘Finder’—which is a blue-colored, face-shaped application, available in your Mac’s Dock.
- Step 8: Upon opening the Finder app, click on the ‘Downloads’ folder from the left-side of the Finder app’s window.
[Note: Even if your browser downloads Microsoft Office setup files to a different folder, for instance ‘Desktop’ then also, click the Downloads Folder’s name instead.
- Step 9: After the Microsoft Office setup file gets downloaded, ‘Double-click’ on the same to prompt it to begin running.
[Note: While running the installation process of your Microsoft Office setup file, if you receive an error like ‘can’t be installed’ then, worry not! Instead, try verifying the download before further continuing because Microsoft software doesn’t always work flawlessly on a Mac despite being a signed developer.]
- Step 10: After the installation finishes, click on the ‘Continue’ button, which is in the bottom-right corner of the first page of the setup.

- Step 11: Similarly, click again the ‘Continue’ button, but this time on the second page of the setup.
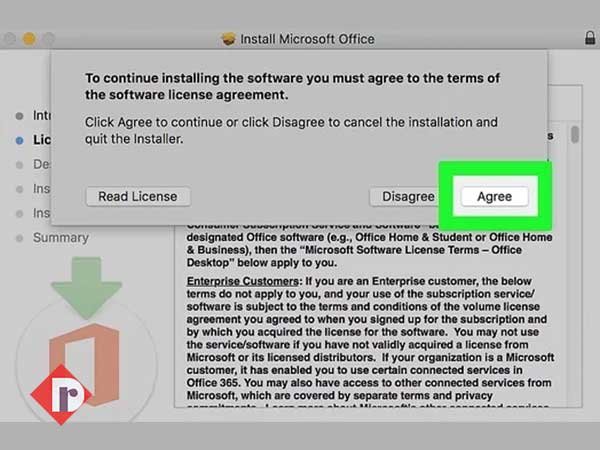
- Step 12: In continuation, click on the ‘Agree’ button to indicate that you agree to Microsoft’s terms of use, followed by the ‘Continue’ button from the bottom-right corner of the same page.
- Step 13: Next, click on the blue colored ‘Install’ button which is, again, in the bottom-right corner of the new page that opens.
- Step 14: Now, as prompted, type your Mac’s ‘Password’ that you used to log in to your Mac computer and click on the ‘Install Software’ button which is there in the bottom-right corner of the ‘Password-entry’ window.

- Step 15: In doing so, the installation of Microsoft Office on your Mac computer will begin, and the process may take a while, so be patient enough to wait. Once it’s done, you’ll receive a prompt, as per which you’ve to click on the ‘Close’ button to finish the installation process.

Congratulations! Your Microsoft Office programs (365, 2019 or 2016) have now been installed on your respective Mac computer, and you’re free to begin using these Microsoft Office’s offered programs, at that moment or whenever you want!
[Note: These above-listed steps of both the 2nd and 3rd sections, will work, no matter if you have an Office 365 subscription, Office 2016 or the slightly older Microsoft Office 2013.]
Bottom Line
That’s all! Hopefully, with the help of this comprehensive guide, you can learn how to install Microsoft Office on your respective Windows or Mac computer system.

