Being an AT&T Mail user, if you’re having any sort of difficulty in managing your AT&T email account on its webmail platform, then we suggest you to not worry anymore! Well, because you can avoid the same by configuring it on an email client application of your respective device.
Having said that, today in this following post, we will explain the configuration process of how to add AT&T webmail to iPhone! So, if you wish to access your AT&T email account on your iPhone then, what are you waiting for, let’s get started—
AT&T Email Server Settings for iPhone 7/8/11 and Above Versions
In order to add your AT&T account successfully on your iPhone, you need the following ATT mail configuration settings—
[Note: These given AT&T server settings are not only required for adding an AT&T email account on iPhone. Rather you need them even if you want to configure Yahoo, SBCGlobal, Bellsouth or any other ATT’s powered email services on iPhone because all these services have been migrated to ‘@Att.net’ domain.]
Incoming (IMAP) Server Att.net Email Settings for iPhone
| Incoming (IMAP) Hostname | imap.mail.att.net |
| Incoming (IMAP) Server Port | 993 |
| Incoming (IMAP) Encryption Security | SSL / TLS |
| ATT (IMAP) Username | Enter your AT&T account’s full email address ending either with @att.net, @att.com, or @att.yahoo.com. |
| ATT (IMAP) Password | Enter your AT&T email account’s password |
Incoming (POP3) Server Att.net Email Settings for iPhone
| Incoming (POP) Hostname | inbound.att.net |
| Incoming (POP)Secure Port | 995 |
| Incoming (POP) Encryption Security | SSL / TLS |
| ATT (POP) Username | Enter your AT&T account’s full email address ending either with @att.net, @att.com, or @att.yahoo.com. |
| ATT (POP) Password | Enter your AT&T email account’s password |
Outgoing (SMTP) Server Att.net Email Settings for iPhone
| Outgoing (SMTP) Hostname for IMAP account-type | smtp.mail.att.net |
| Outgoing (SMTP) Hostname for POP account-type | outbound.att.net |
| Outgoing (POP/IMAP) Secure Port | 465 or 587 |
| Outgoing (SMTP) Encryption Security | SSL/TLS for port 465 and STARTTLS for port 587 |
| ATT (SMTP) Username | Enter your AT&T account’s full email address ending either with @att.com, @att.net or @att.yahoo.com. |
| ATT (SMTP) Password | Enter your AT&T email account’s password |
Also, you can consider reading: Workable Solutions to Fix a Range of AT&T Not Working Problem
Having these AT&T Mail Settings handy, all the AT&T users who wish to access their email account on iPhone now, proceed with the configuration process of how to setup AT&T email on iPhone by simply following these steps—
Execute These Steps to Add AT&T Email Account on iPhone
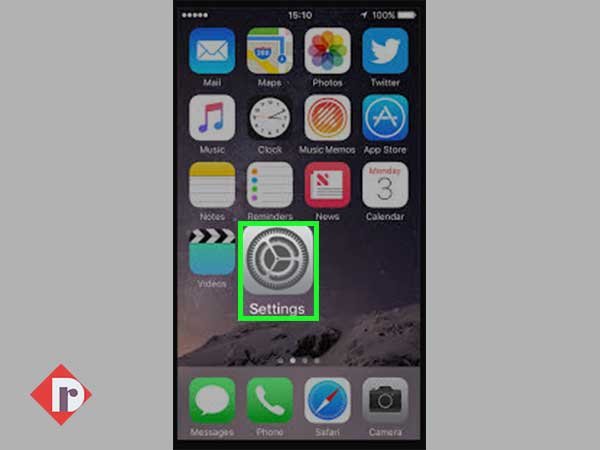
- Step 1: Open your iPhone ‘Settings’ by tapping on the ‘Settings Icon’ from the application’s menu.
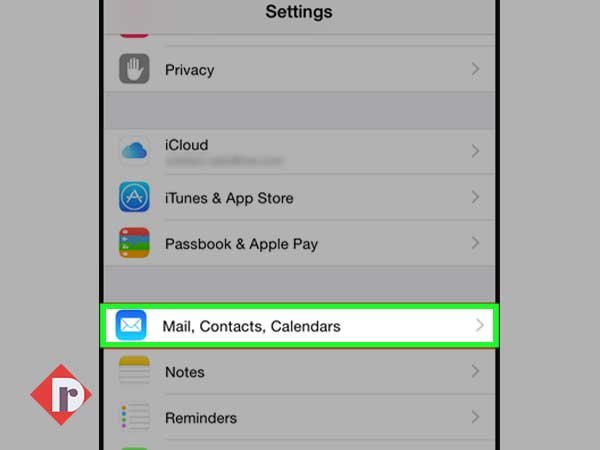
Step 2: Inside the setting page, scroll down to tap on the ‘Mail, Contacts and Calendars’ option. [Note: In some iPhone versions, you’ve to select the ‘Passwords & Accounts’ option instead of Mail, Contacts and Calendars.]
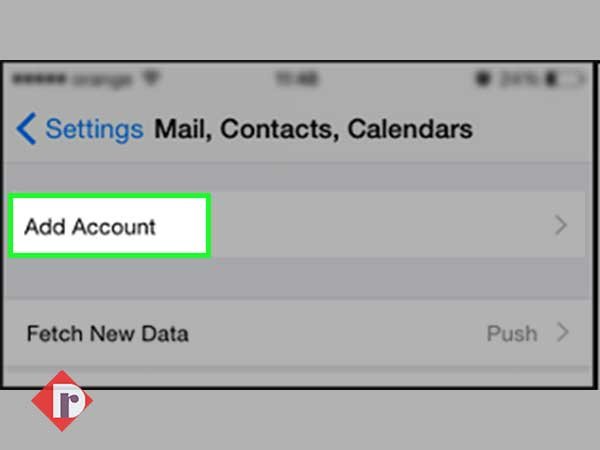
Step 3: Then, tap on the ‘Add Account’ option from the Mail, Contacts and Calendars settings page.
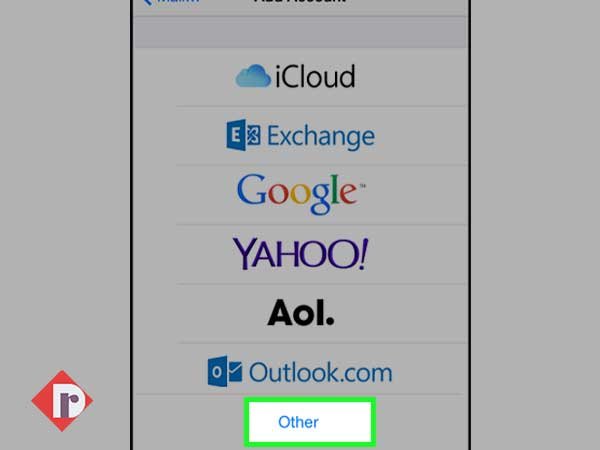
Step 4: After that, a list of email providers will appear on the screen and out of all the options, select ‘AT&T.Net’ email provider name. However, if it is unavailable then, you have to select the ‘Other’ option from on the list.
[Note: As mentioned above, AT&T has overtaken the Yahoo email administration as well, so if you want you can also “Setup AT&T Email on iPhone” via selecting ‘Yahoo’ as the email provider.]
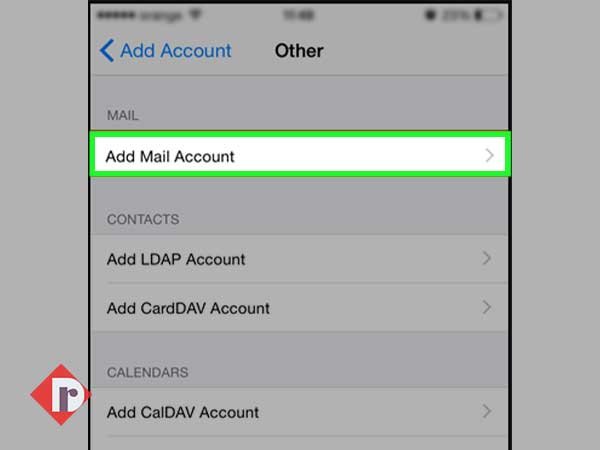
Step 5: In doing so, you’ll be redirected to the subsequent screen and there, you’ll have to tap on the ‘Add Mail Account’ option.
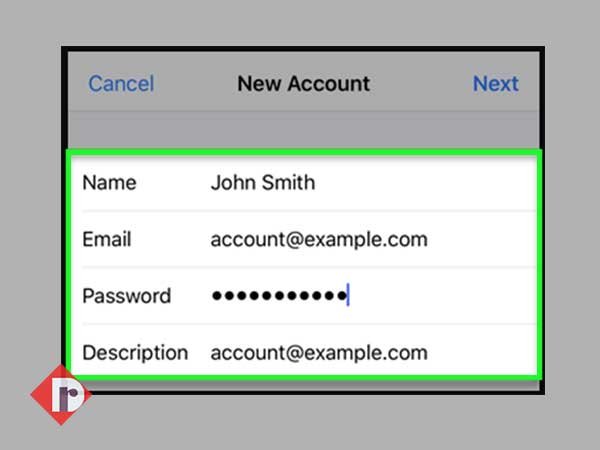
Step 6: Now, in order to add your ATT email account on your iPhone, provide the associated ‘User-Data’ of your AT&T email account in the below-mentioned respective text-fields and once you finish entering the same, tap on the ‘Next’ button to proceed.
- Name: ______ (Here enter your Full Name)
- Email: ______ (Here enter Email Address of your AT&T Account)
- Password: ______ (Here enter Password of your AT&T Email Account)
- Description: ______ (Here enter a Short Description of AT&T Mail or simply your AT&T Email ID)
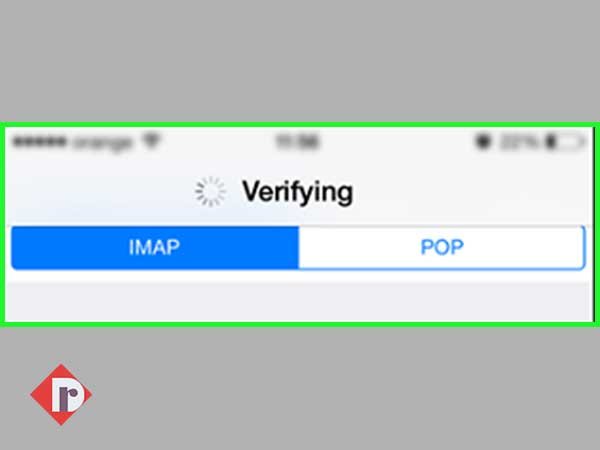
Step 7: In continuation, fill the “Att.net Email Settings for iPhone” right after selecting either ‘IMAP’ or ‘POP’ as your ATT account-type option. [Note: Though you can select any from the two, AT&T IMAP settings is considered more advanced and efficient in syncing emails across various devices. So, owing to this fact, make your selection wisely.]
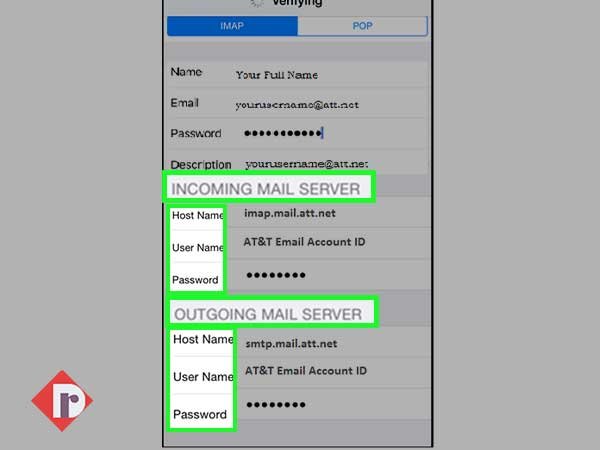
Step 8: If you’ve selected ‘IMAP’ as your account type then, enter the following information—
- Under the ‘Incoming Mail Server Settings’ section;
- Hostname: imap.mail.att.net
- Username: Your ATT Email Account ID
- Password: Your ATT Email Account Password
- Under the ‘Outgoing Mail Server Settings’ section;
- Hostname: smtp.mail.att.net
- Username: Your ATT Email Account ID
- Password: Your ATT Email Account Password
Step 9: Similarly, if you’ve selected ‘POP’ as your account type, then enter the following information—
- Under the ‘Incoming Mail Server Settings’ section;
- Hostname: inbound.att.net
- Username: Your ATT Email Account ID
- Password: Your ATT Email Account Password
- Under the ‘Outgoing Mail Server Settings’ section;
- Hostname: outbound.att.net
- Username: Your ATT Email Account ID
- Password: Your ATT Email Account Password
Step 10: Upon carefully entering both the ‘Incoming and Outgoing Server Information,’ tap on the ‘Save’ option to connect your AT&T.net email account with your iPhone.

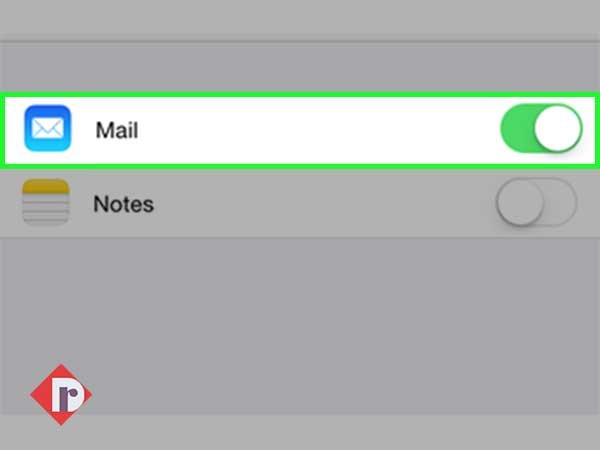
Step 11: In addition to the same, you’ve to make sure that the ‘Mail’ option is checked. However, if not then, simply tap on its toggle switch to turn it green. Well, because until and unless it remains unchecked, ATT emails won’t be synced to your iPhone.
Step 11: Now, exit your iPhone’s Settings and again tap on following options ‘Settings > Mail > Accounts’ in order to select your recently added ‘AT&T email account.’
Step 12: Afterwards, scroll down to tap on the ‘Advanced’ option and ensure that the “Incoming Server” section contains the following information—
- Use SSL: Yes
- Authentication: Your ATT Email Account Password
- Server Port: 993 for IMAP or 995 for POP
Step 13: In the same manner, ensure that the “Outgoing Server” section has the following information:
- Use SSL: Yes
- Authentication: Your ATT Email Account Password
- Server Port: 465 for both IMAP or POP
Step 14: In the end, tap on ‘Done’ and then, press the ‘Home’ button to finally exit the settings app and return to the main iPhone screen. On reaching there, swipe the screen left or right and tap on the ‘Mail’ icon to launch your iPhone’s email application having your AT&T emails on it.
That’s all! You’re now all set to use your AT&T Mail on your respective iPhone. However, as you finish the configuration process, consider giving a quick restart to your iPhone to make sure it functions smoothly on your iOS device.
Note: Like this step-by-step guide, if you also want to learn about how to setup and configure AT&T Email on Outlook email client, read here.