“Outlook” apart from delivering excellent inbox organizational tools, unlimited storage, and easy to use interface, can also be used to configure other email accounts such as “Bellsouth” and in fact, the collaboration of the same with Outlook works great for many of the Bellsouth users.
Considering that, if you also want to set up your Bellsouth email account on Outlook then, you’ve made the right decision. However, it is essential to note that, except Hotmail, all third-party email clients require a manual configuration approach of the incoming and outgoing servers during their setup process on Outlook. That’s why, for Bellsouth email also, you don’t have the option to go for the automatic configuration process that can sync email accounts by just entering their respective credentials.
Having said that, here in this following post, you’ll find the Bellsouth email settings for Outlook and how you can set up your Bellsouth email account on Outlook using those given settings. However, before anything else, let’s consider—
What Are the Requirements For The Configuration of Bellsouth in MS Outlook?
Well, the followings are all what you require to have before you start the configuration process to set up Bellsouth email in Outlook:
- A better (steady, strong, and secure) network connection in your device where you want to configure Bellsouth email on the Outlook email client.
- Note down and be ready with the correct login credentials of your Bellsouth email account such as Username, Email Address, and Password, etc.
- Run your MS Outlook program in Safe Window Mode to ensure that no third-party software will interfere in the configuration process.
| Press Win+ R > Enter Outlook/safe in the Run dialog box > click on the OK button. |
- Albeit, optional, perform a backup of your Bellsouth account for avoiding any loss of your account’s data after the configuration process.
- Keep the below-mentioned Bellsouth.Net Email Settings for Outlook handy—
Bellsouth Incoming and Outgoing IMAP Email Settings
| Incoming Mail Server of Bellsouth Outlook Settings | Outgoing Mail Server of Bellsouth Outlook Settings | ||
| Incoming Server Name: | imap.mail.att.net | Outgoing Mail Server Name: | smtp.mail.att.net |
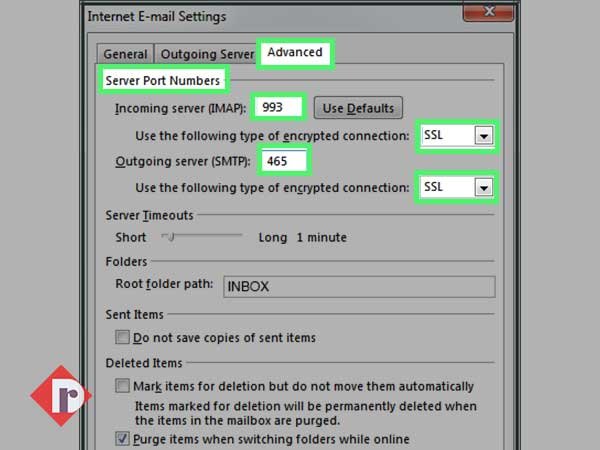
| Incoming Mail Server Port: | 993 | Outgoing Mail Server Port: | 465 |
| Incoming Email Server SSL Required: | YES | Outgoing Email Server SSL/TLS Required: | SSL-YES / TLS-YES (if available) |
| Authentication Required: | YES | Authentication Required: | YES |
| Incoming Email Server User Name: | Your full Bellsouth email username/email ID | – | – |
| Incoming Email Server Password: | Your Bellsouth account’s password | – | – |
Bellsouth Incoming and Outgoing POP Email Settings
| Incoming Mail Server of Bellsouth Outlook Settings | Outgoing Mail Server of Bellsouth Outlook Settings | ||
| Incoming Server Name: | pop.mail.att.net | Outgoing Mail Server Name: | smtp.mail.att.net |
| Incoming Mail Server Port: | 995 | Outgoing Mail Server Port: | 465 |
| Incoming Email Server SSL Required: | YES | Outgoing Email Server TLS/SSL Required: | SSL-YES / TLS-YES (if available) |
| Authentication Required: | YES | Authentication Required: | YES |
| Incoming Email Server User Name: | Your full Bellsouth email username/email ID | – | – |
| Incoming Email Server Password: | Your Bellsouth account’s password | – | – |
[Note: Bellsouth’s Internet and Email Services have been merged with AT&T email service provider, so the Bellsouth.Net Server Settings are also updated according to this development. Thus, the following mentioned server settings of Bellsouth email are according to that of AT&T services. So, in order to configure Bellsouth in Outlook or in any other email client, one has to use the following Bellsouth Server Settings of AT&T Mail only.]
Once you meet these requirements, you’re good to go to execute the below-mentioned process of setting up your Bellsouth email account in MS Outlook.
Configuration Process to Setup Bellsouth Email in Outlook Using Bellsouth IMAP Server Settings
If you correctly follow the steps of the below-given guide, then you’ll find it very easy and simple to add Bellsouth email settings in Outlook email client for the configuration of your Bellsouth account in Outlook. So, let’s get started—
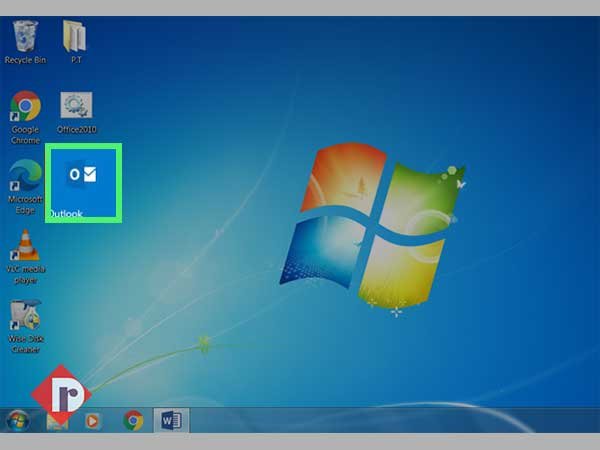
| Step 1: | First and foremost, launch the MS Outlook application (whichever version of the app you have) on your respective computer device by clicking on its icon. |
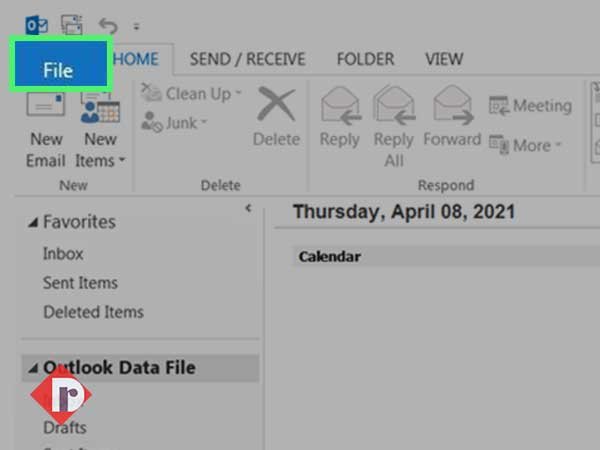
| Step 2: | As the Outlook app launches, look at the top left corner of the screen and locate the ‘File Tab’ to click on the same. [Note: For Outlook 2010 and previous versions, instead of File Tab, you’ve to select the Tools option.] |
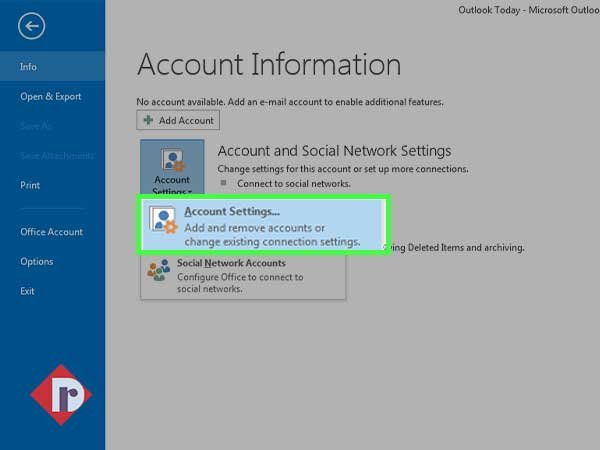
| Step 3: | In doing so, the file’s menu will appear on the screen and its ‘Info’ section will open by default. From the Info section, click on the Account Settings Box’s down arrow to open its list of options. |
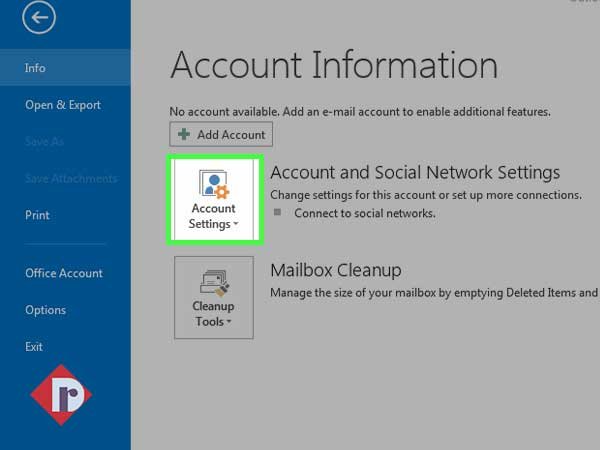
| Step 4: | From the available list of two options, you’ve to simply select the first ‘Account Settings’ option. |
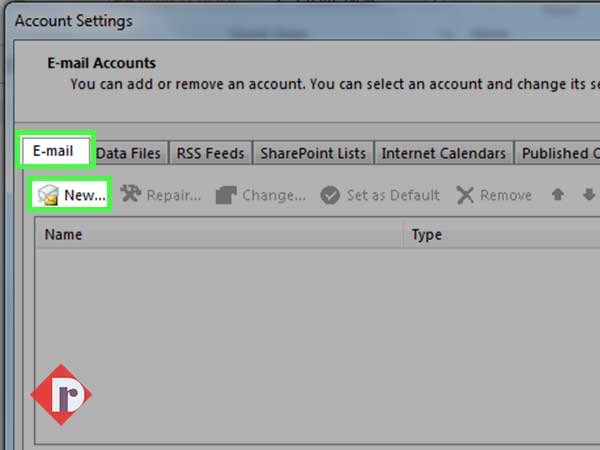
| Step 5: | After that, you’ll see an ‘Account Setting wizard box’ on the app screen. Inside the same, you’ve to first click on the ‘Email Tab’ and then, on the ‘New’ option. |
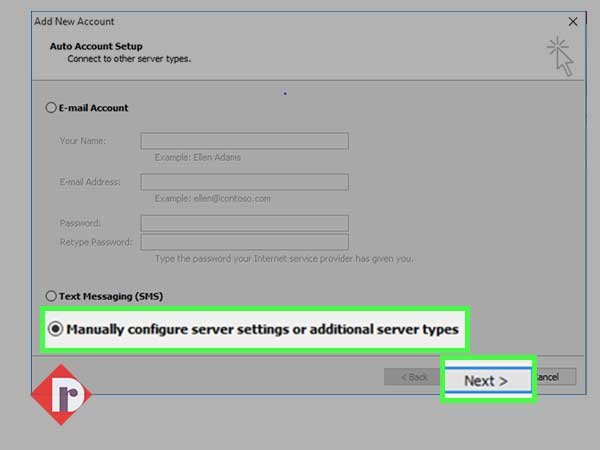
| Step 6: | This time, an ‘Add Account wizard box’ will appear in front of you, and from it, you’ve to click on the radio button of ‘Manual Setup or Additional Server Types.’ Then, to move further with the process hit the ‘Next’ button. |
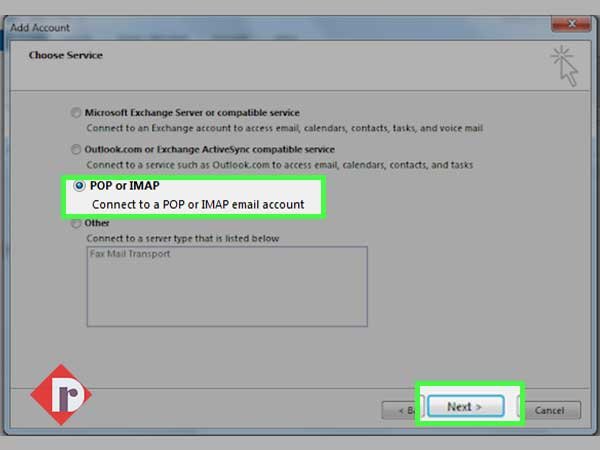
| Step 7: | On the subsequent ‘Choose Service Page’ all you need to do is select a particular service from the available options. Here, in the Outlook 2013 version, you’ve to click on the radio button of the option entitled ‘POP or IMAP.’ And, right after that, again hit the ‘Next’ button to navigate further. [Note: To configure Bellsouth.Net Email Settings on Outlook 2016 and the more advanced version, you must click on the Internet Email (connect to POP or IMAP server to send and receive e-mail messages) radio button, instead.] |
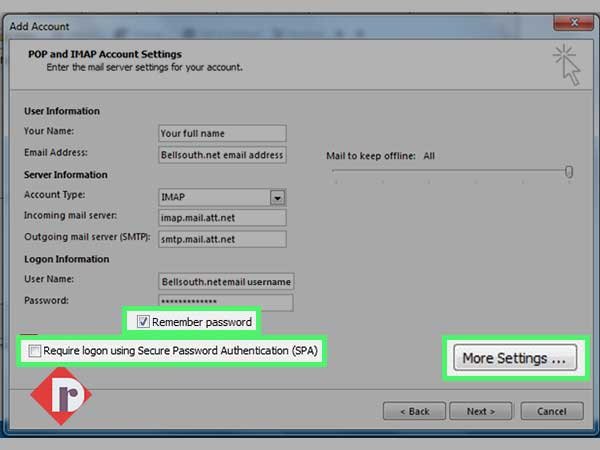
| Step 8: | Now, as you’ll be directed onto the ‘Internet Email Settings Page,’ you need to provide the above-mentioned settings of your Bellsouth account here in these respective three sections— 1. User Information Section 2. Server Information Section and 3. Logon Information Section |
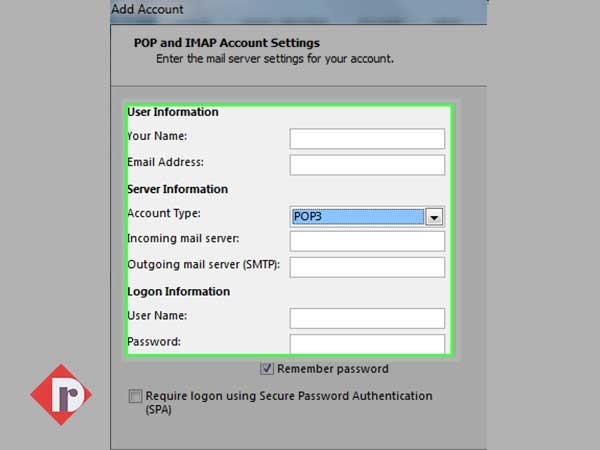
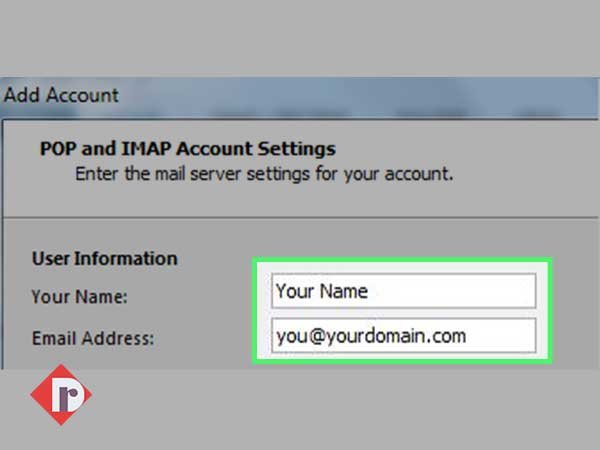
| Step 9: | Inside the ‘User Information Section,’ enter associated user-data of your Bellsouth account in the respective—
|
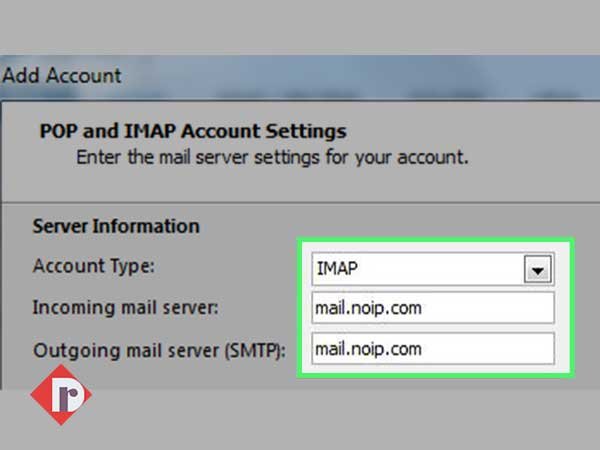
| Step 10: | Inside the ‘Server Information Section,’ you should select the ‘IMAP’ server from the Account Type drop-down menu. Then, enter the following server details of the same—
[Note: The reason for selecting IMAP over POP is simple. IMAP is more advanced and offers better flexibility to manage and sync data across various devices as well as email clients.] |
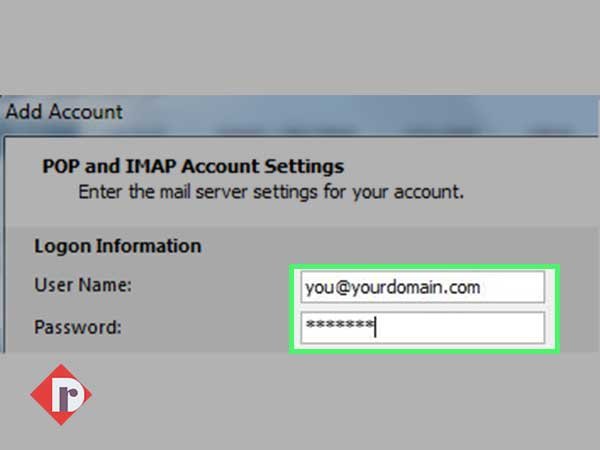
| Step 11: | In the last ‘Logon Information Section,’ enter your Bellsouth email account’s login credentials i.e., your user name and password in the respective given text fields—
|
| Step 12: | Once you finish entering the Bellsouth server settings, move forward to tick-mark the following two options available there on the same Internet settings page—
And, in addition to the same, click on the ‘More Settings’ link from the lower-right corner of the page to continue further with the setup process. |
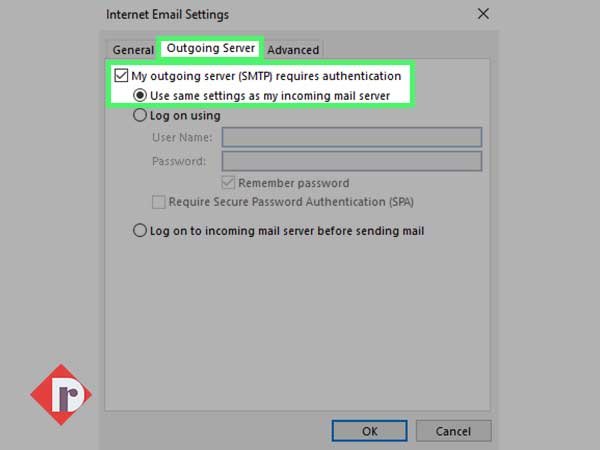
| Step 13: | There on the second page of Internet Email settings, click on the ‘Outgoing Tab’ to select the checkbox and radio button of these two available options, respectively—
|
| Step 14: | In continuation, click on the ‘Advanced Tab’ for providing the following port settings of Bellsouth IMAP Email Settings under the ‘Server Port Numbers’ section—
|
| Step 15: | There, select the ‘Test Account Settings’ option and hit the ‘Next’ button to ensure you’ve properly configured your Bellsouth email in Outlook. |
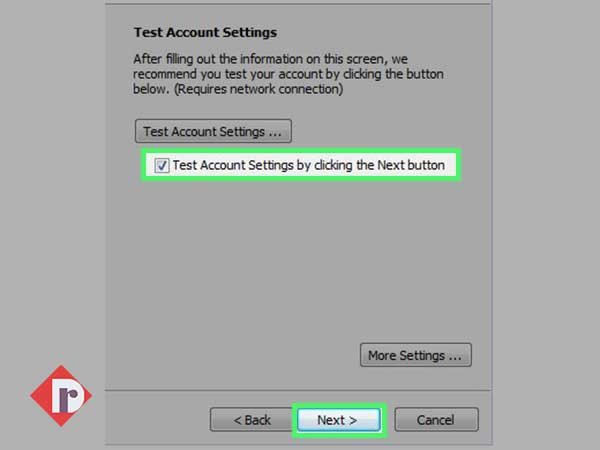
Well, if you receive this message— ‘Congratulations! All tests completed successfully’ then, in the end, just click on the ‘Close’ button to finish the configuration of your Bellsouth email account in Outlook.
However, even if the test fails, we suggest you worry not! You can try again to configure your Bellsouth email account in Outlook by entering the POP Bellsouth server settings in the place where you’ve entered the IMAP Bellsouth server settings. To be precise, you can set up your Bellsouth email account in Outlook with the email settings of the Bellsouth POP server.
And, as we’ve just mentioned, the process is almost similar to the one you’ve gone through above. However, of course, we made sure to still explain it below. So, have a look at these briefly explained steps to—
Setup Bellsouth Email Account in Outlook Using Bellsouth POP Server Settings
- Step 1: Open Outlook
- Step 2: Select File > Account Settings > New.
- Step 3: Choose Manual Setup.
- Step 4: Select POP or IMAP (connect to POP or IMAP server to send and receive e-mail messages)
- Step 5: Input Information in the User Information Section.
- Step 6: Input Information in the Server Information Section:
- Here, you’ve to first select ‘POP’ server from the Account Type drop-down menu and then, enter the following server details of the same—
- In the Incoming Mail Server: enter ‘pop.mail.att.net’
- In the Outgoing Mail Server: enter ‘smtp.mail.att.net’
- Step 7: Input Information in the Logon Information Section.
- Step 8: Select More Settings.
- Step 9: Complete the Outgoing Server Information.
- Step 10: Open Advanced Tab for providing the following port settings of Bellsouth POP Email Settings under ‘Server Port Numbers’ section—
- In the Incoming Server (IMAP): enter 995
- In the Outgoing Server (SMTP): enter 465
- Use the following type of encrypted connection: select SSL for the incoming server and TLS for the outgoing server (if available) otherwise, SSL.
- Step 11: Click OK.
- Step 12: Select Test Account Settings.
- Step 13: If successful, click Finish.
Most probably, now, you should be able to receive and send Bellsouth emails in Outlook email client and that too, without encountering any ‘Bellsouth Email Login Issues.’