Summary: In this Article, you’ll get to read about —
Unfortunately, Microsoft Outlook despite being a reliable platform for sending, receiving, and managing emails, as well as for organizing the user’s information, including contacts, calendar, appointments, notes and so on for decades and decades now; can occasionally throws many errors at users and cannot connect to the server is one of them.
While it is common for the majority of the Microsoft users to come across the Outlook not connecting to Server error, there are still many users who look for its solutions as it keeps one away from sending and receiving emails with the recipients and also from configuring other email clients to Outlook.
So, if you too are having problems connecting to the server that won’t let you either send or receive any message or mail then, this can be extremely critical and annoying at the same time especially when you rely on Outlook for all your emailing needs and other crucial tasks.
Also, Read This: 11 Quick Work Arounds to Try When Outlook Won’t Let You Sign-In
However, don’t you worry because having this in mind, today in this particular post, we’ve discussed the “Outlook cannot connect to the server” infamous error in detail so that— you can learn not only about the reasons for its occurrence but also about the possible workarounds to fix it in no real time.
With that said, let’s just begin!
MS Outlook—‘that is a part of the Microsoft Office Suite’ broadly relies on IMAP, SMTP, and POP email protocols for maintaining its smooth functioning. So, whenever Outlook fails to maintain its connection with either of them, you encounter this error that goes by the name ‘Outlook cannot connect to the server.’
We know, at this point of time, though it is quite essential to immediately resolve such a connectivity problem from Microsoft Outlook but, the fact is you won’t be able to do this properly until and unless you know what may cause Outlook to not connect to the Server!
Why Microsoft Outlook Cannot Connect to Server?
As Outlook works by fetching all the emails into local storage and make you view them from your computer device, this might not work if the application itself isn’t able to connect and the possible reasons why this might happen are as follows—
- Bad Internet Connection
- Work Offline Mode Enabled
- Damaged PST File
- Corrupt Outlook Profile
- Damaged/Out-dated Microsoft Office Application
- Corrupt Outlook Program Data Files
- Corrupt Office Installation
- Incompatible or Faulty Third-party Outlook Add-ins
So, these are some of the common reasons that clearly explain why you are stuck with the “Outlook cannot connect to server” error and are here!
Now, you’re ready to go through and implement the below listed solutions to annihilate the server connectivity issue:
14 Effective Solutions to Fix ‘Outlook Cannot Connect to Server’ Error on Windows 10
Note: You need not have to try all these troubleshooting solutions mentioned underneath. Just, apply one solution after another and check when your Outlook connects back to the Server, to stop the troubleshooting.
Solution 1: Restart Your Device
As with most technical issues, it is always advisable to start with the most simple solution i.e., to restart your device. Restart is such a basic solution that anyone would recommend you in the first place! Well, it’s because a simple system restart can sometimes work wonders with connectivity related issues with Windows and other applications.
So, try to restart your computer and router completely to eradicate any error configurations that they are in—as these devices are known to get into error states once in a while due to a bad update or unexpected shutdowns leading to issues like the one you’re encountering with Outlook.
However, of course there are those times also when that solves absolutely nothing. In that case, follow the next solution.
Solution 2: Check Internet Connectivity on Your Computer
Another basic solution is to ensure whether there’s a valid Internet connection in your device or not.
Until and unless your internet connection is weak or its bandwidth and speed are low; applications like Outlook won’t be able to connect to the server. So, therefore, it is necessary to check your internet connection and switch to another network for better connectivity.
By doing so, if the issue gets resolved then, in the future also, be certain to connect your device with a much more stable, smooth and continuous internet connection.
However, if the case is opposite and you still see the same error message that ‘Outlook cannot connect to the server,’ move on to try the next solution which is one of the proper workarounds for Outlook server connectivity issues.
Solution 3: Uncheck Outlook Working Offline Mode
‘I Have Internet but My Outlook Won’t Connect’ –this is also a cause of concern. So, despite having a proper internet connection, if you’re facing connectivity issues in Outlook then, there’s a chance that Outlook is somehow set in ‘Working Offline’ mode.
In the offline mode, Outlook won’t be able to connect to any servers or deliver/receive any email even if the internet is available and thus, leads to “Outlook cannot connect to server” error.
So, it is really important that you verify whether Outlook is online or is in Offline mode and if it comes out to be the latter case then, in order to fix the encountered error; you need to disable the ‘Working offline mode’ and bring Outlook back to online mode.
To do so, follow these simple steps—
- Step 1: Launch Outlook program on your respective computer system.
- Step 2: Then, navigate to the ‘Preferences Group’ on the ‘Send/Receive Tab’ –which is located in the navigation pane.
- Step 3: There, you simply need to click on the ‘Work Offline’ button to turn it ‘Off.’
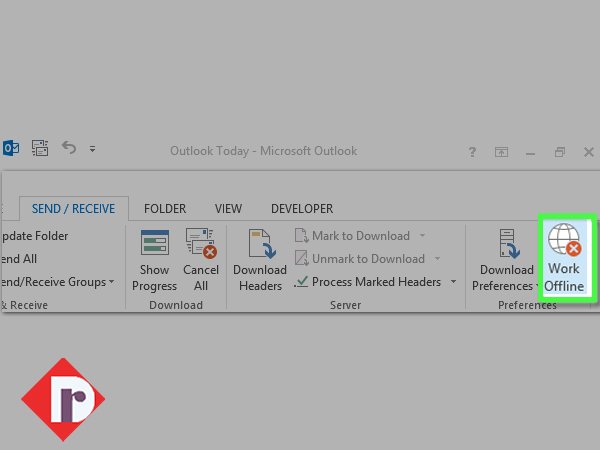
[Note: The given steps work in case you’re using Outlook 2010 or any latest versions. For Outlook 2007 and/or previous versions, consider clicking on the ‘File Tab’ there, locating the ‘Work Offline’ option and unchecking the same.]
Now, when you disable the ‘Work Offline Mode,’ look at the bottom of your Outlook window. There, you should see a message that reads—‘Trying to connect….’ and if it connects then, it means your connectivity issue has been sorted out. But, if it’s still not connecting, you can move on to try the next workaround from the list.
Solution 4: Check Your Email Credentials
Sometimes, in panic we overlook the simplest solutions. For instance, checking your email credentials, in this case. Yes, entering the wrong credentials due to reasons such as a changed password or typo-error can make you unable to access your Outlook email account and induce errors related to Outlook connectivity.
Therefore, you should check your email credentials along with your account info to make sure you’re entering your authentic details while you log in.
And, to do this, you need to use these steps—
- Step 1: Open the Outlook app.
- Step 2: Once opened, click on its ‘File’ tab.
- Step 3: Then, select ‘Info’ from the file’s menu.
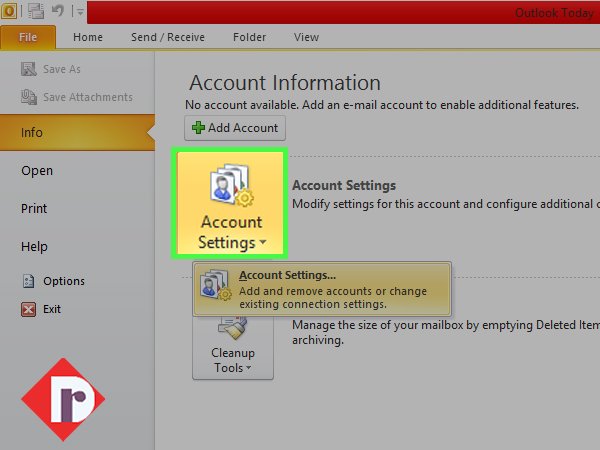
- Step 4: Following that, click on ‘Account and Social Network Settings’ option and then on ‘Account Settings.’ As you do so, you’ll be taken to the ‘Settings’ window.

- Step 5: There, on the settings window, navigate yourself to the ‘Email’ tab and simply select your account.
- Step 6: Next, you need to look for the ‘Remove’ icon which is there on the top panel and click on the same to remove your account that you’ve selected in the previous step.
- Step 7: Now, when your account is removed, head back to the homepage and try to log in this time using the right credentials. In doing so, make sure you double-check the spelling of your credentials, spaces (if there’s any) and also all the special characters.
Once you’ve done that, you can check if you’re now able to connect Outlook to the server or not!
Solution 5: Check for Microsoft Exchange Server Issues
If the ‘Outlook cannot connect to server’ error persists, you can consider verifying whether the Microsoft Exchange server is active or not.
Although, the chance of getting ‘Microsoft Exchange server down/offline’ issue is nearly impossible, you can still check for the same as errors in technology can be uncertain.
Having this in mind, here’s what all you need to do—
- Step 1: To check problems with Microsoft Exchange server, first open Outlook.
- Step 2: Then, navigate to “File > Info > Account and Social Network Settings > Account Settings.”
There on the settings window, if you see an orange-colored icon on the left-hand side, next to your account then, it simply indicates to you that there’s a problem with the server.
However, note that this requires no fix from your side until and unless you are the admin who’s responsible for your organization’s Exchange Server.
[Note: Microsoft will not take too much time to resolve the problem with Exchange Server.]
Once the problem with the Exchange server gets resolved, you can connect back to the Internet—as the servers are online again.
On the contrary, if the Microsoft Exchange Server is active and working fine, you can head towards the next given solution to fix the encountered error.
Solution 6: Update Outlook If Running on Outdated or Older Version
Every technology, software and application available in this world are prone to bugs as well as minor and major technical glitches. In light of this fact, Outlook is no exception. Time and again, Outlook receives unexpected errors and issues. However, to fix them, Microsoft sends updates at regular intervals.
But, in case you’ve canceled or postponed an update in the past, and are still running on the old or outdated version of Outlook then, no wonder why you’re now receiving an error in Outlook.
Never mind, it’s better late than never. You can now, update Outlook to the latest version via following these instructions—
- Step 1: Launch the Outlook app on your respective computer system.
- Step 2: Once Outlook opens, click on the ‘File’ tab from its top navigation panel.

- Step 3: Then, click on ‘Office Account’ as well as ‘Update Options’ from the file’s menu that appears.
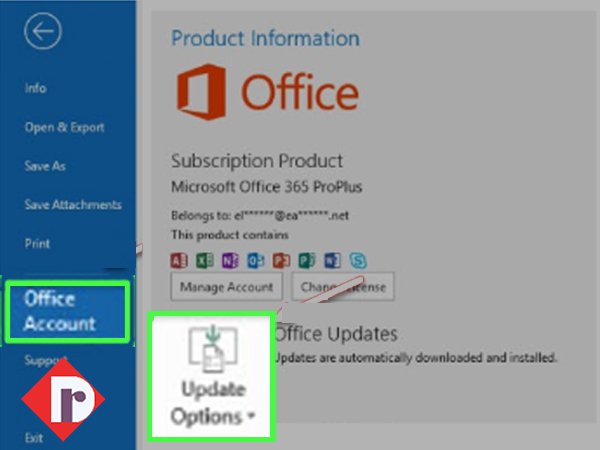
- Step 4: Following that, what you’ve to do is click on the ‘Update Now’ button and wait until the program automatically detect the latest update for the particular Outlook’s app version, you have.
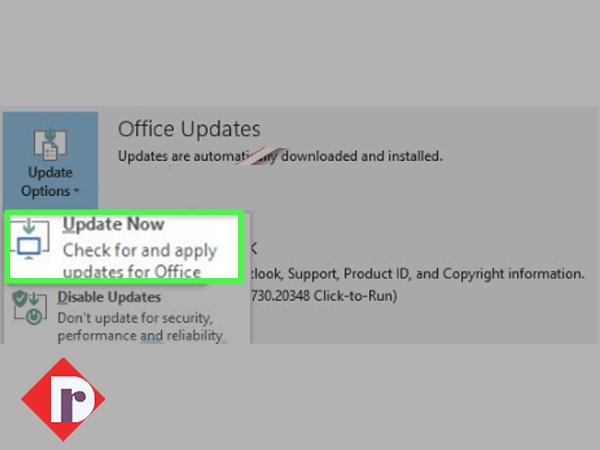
- Step 5: Now, just go through the on-screen instructions to finally finish updating your Outlook application.
- Step 6: Lastly, reboot your device and then, reopen Outlook to check whether now it gets connected to the server or not.
In case, if still Outlook is not connecting to the server, you can try the next lined-up solution.
Solution 7: Disable or Uninstall All Extensions/Add-ins
Albeit, most of the extensions and add-ins that are available for Outlook are developers verified but, there are certain add-ins on the Outlook (or even anti-virus program) that conflict with Outlook settings and restrict the server connection for considering it as a potential threat.
Thus, you should disable all such programs or applications, especially extensions and add-ins which may hinder the server connection of Outlook.
To do so, follow these given steps—
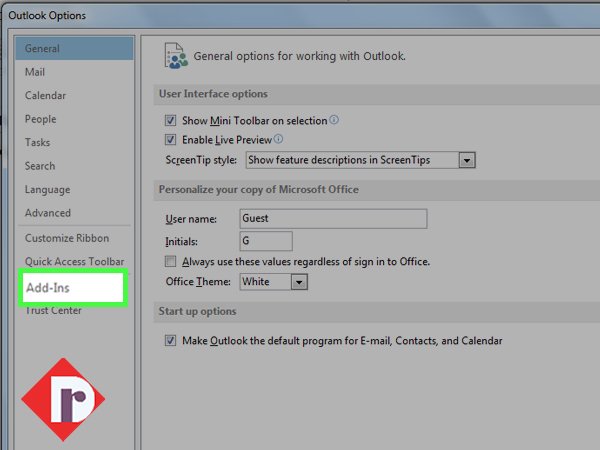
- Step 1: On Outlook homepage, click on the ‘File Tab’ to open File’s menu.
- Step 2: Then, click ‘Options’ from the appeared file’s menu.
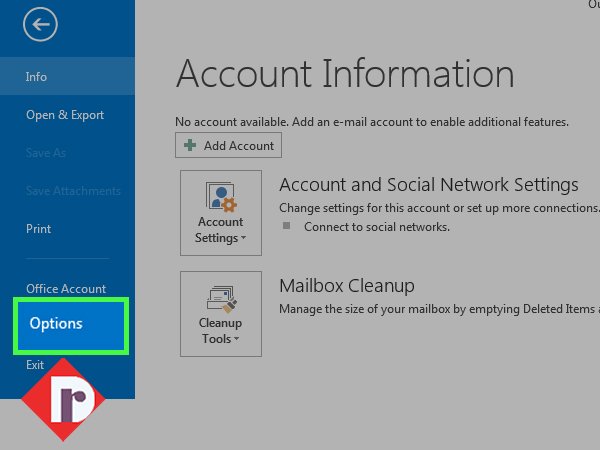
- Step 3: Next, you need to click on the ‘Add-ins’ section.
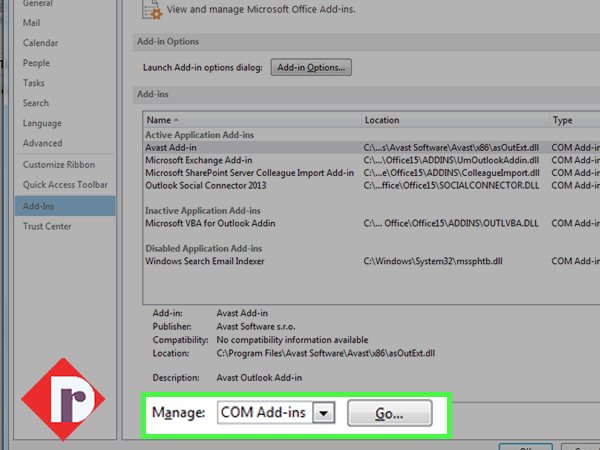
- Step 4: Following that, what you’ve to do is go to the bottom of the screen and click on the ‘Manage’ drop-down arrow to select the “COM Add-ins” option from it.
- Step 5: In continuation, click on the ‘Go’ button and as you do so, you’ll see the complete list of ‘Add-ins’ that you’ve installed in your Outlook application
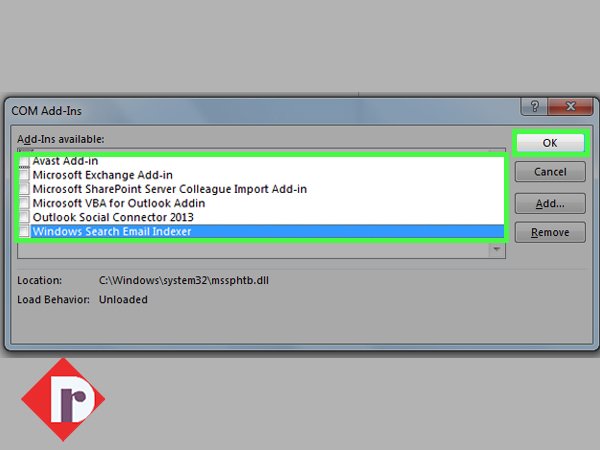
- Step 6: Now, from the list of add-ins that appeared on the screen, you need to simply ‘Uncheck’ the checkboxes of those add-ins that you find suspicious in any manner. Alternatively, you can also clear all the add-ins in one go.
- Step 7: Upon doing so, just click on the ‘OK’ button and give a quick restart to your ‘Outlook’ application.
After you finish disabling Outlook add-ins, check whether the issue still prevails or not! If it works, you can start adding the add-ins one after the other till the issue reoccurs. In doing so, you’ll be able to identify and remove that one particular add-ins that is causing the “Outlook cannot connect to IMAP server” problem.
However, in case the issue doesn’t resolve even after disabling Outlook add-ins, you can move on to try the next listed solution.
Solution 8: Create New Outlook Data File
Whether you know or not, data files are crucial in Outlook as they are the source of many errors for quickly becoming large, unwieldy and even corrupted and lead to unnecessary trouble in the smooth functioning of Outlook.
Therefore, considering these files as the cause of the problem, you can create a new data file and to do this, you need to just follow these instructions—
- Step 1: To create a new data file, run ‘Outlook’ on your respective system and click on its ‘File’ tab.
- Step 2: Then, from the file menu, select ‘Info’ followed by ‘Account and Social Network Settings’ option.
- Step 3: Next, you’ve to simply click on the ‘Account Settings’ drop-down box to select the ‘Account Settings’ option.
- Step 4: As you click on the account settings option, navigate to the ‘Data Files’ tab and select the ‘Email ID’ that probably causing the problem.
- Step 5: After that, you simply have to click on ‘Open File Location’ option.
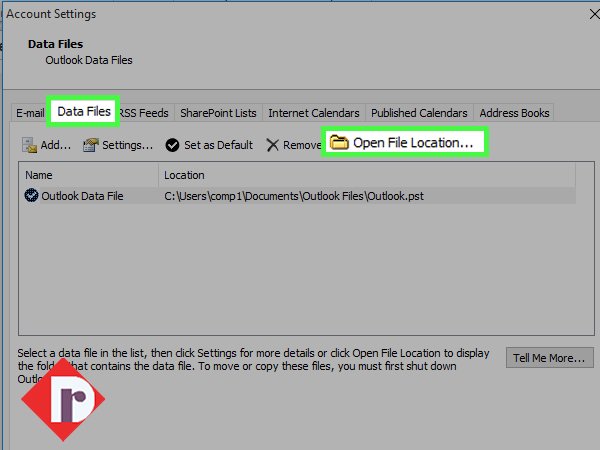
- Step 6: In doing so, when Windows Explorer opens, see if you find an “.ost file” there. If yes, you’ve to right-click that file and simply click on ‘Rename’ from the contextual menu that pop-ups to rename the file name extension as— “.old.”
- Step 7: Following that, you need to simply copy your data file to another location or if you want, you can also modify the file’s extension on a temporary basis.
Now, quickly ‘Restart’ your Outlook program as doing so will recreate/rebuild the data file for you.
However, note that while using this option, the old data will not be accessible and instead, you’ll have to look for ways to repair the old Outlook data file to simply extract data from it.
Solution 9: Re-Create Your Outlook Profile
In the same manner, if the problem is related to your Outlook profile or in simple words if you’re having a problematic Outlook profile, you can have a look at how you can recreate your Outlook profile—
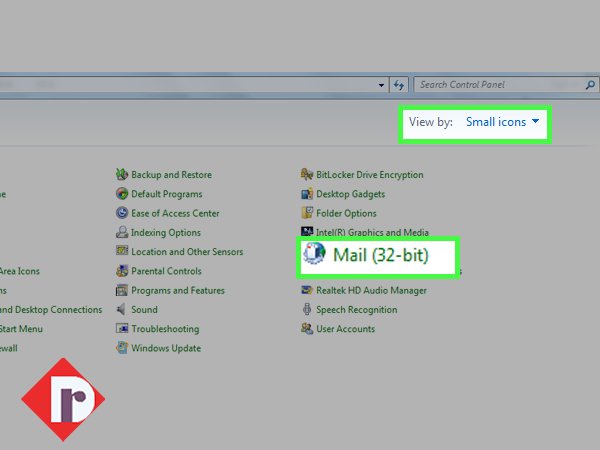
- Step 1: Open the ‘Control Panel’ app and click on the ‘Mail (32-bit)’ option after choosing “Small icons” for ‘View by.’
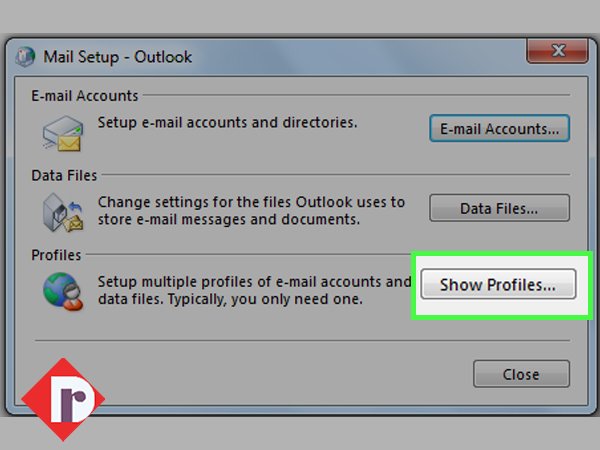
- Step 2: As you do so ‘Mail Setup- Outlook’ wizard box will appear on the screen and inside it; you’ll have to simply click on ‘Show Profiles’ button.
- Step 3: Then, select your Outlook profile that you want to remove, and just click on ‘Remove.’
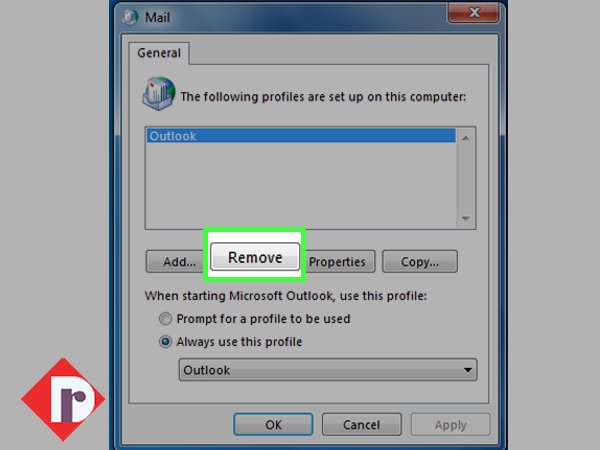
- Step 4: Upon removing your Outlook profile, you can now click on the ‘Add’ button to add a new profile.
- Step 5: In addition, you need to give a name to your new Outlook profile and for that, simply type a ‘Name’ in the ‘Profile Name’ box
- Step 6: Next, it is also important that you specify the “Username, the primary SMTP address, and the Password” before you hit the ‘Connect’ button.
- Step 7: Following that, make sure that you set up your new Outlook profile correctly by following the Outlook wizard setup process that include—
- Selecting the ‘Don’t ask me about this website again’ checkbox,
- Clicking on ‘Allow’ and
- Entering your ‘Logon Credentials.’
- Step 8: Once the setup is finished, click on ‘OK’ followed by the ‘Finish’ button.
Now, as your new user profile for Outlook is created, you can log in to the same with its credentials to check whether your Outlook starts working fine or not.
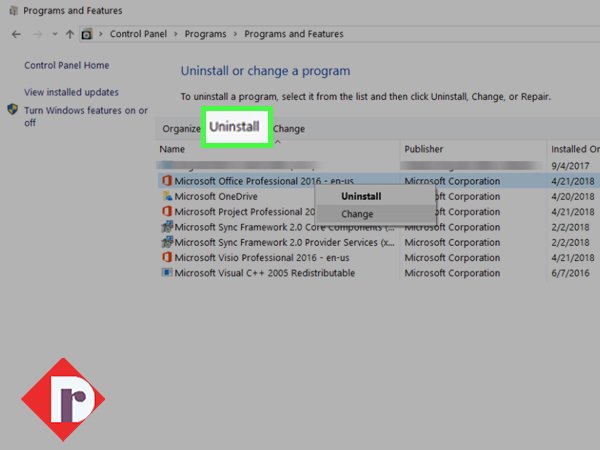
Solution 10: Reinstall Office 365
No-brainer, damaged or corrupted Microsoft Outlook or Office program files also can lead to server connectivity errors that you’re currently encountering.
So, if that is the case, you can resolve the encountered ‘Outlook cannot connect to the Server’ error by repairing or reinstalling the MS Office program with the help of these given steps—
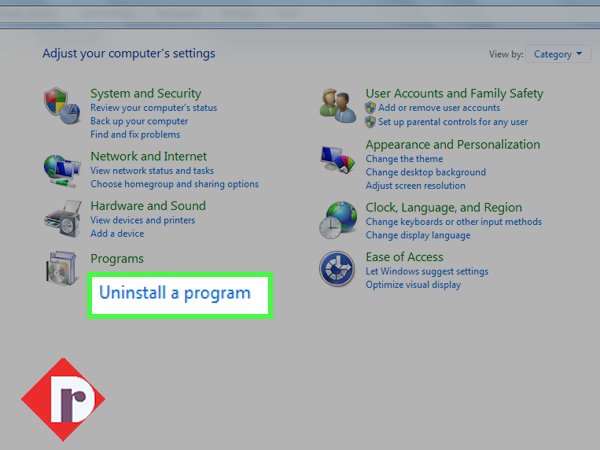
- Step 1: Press the ‘Windows logo’ key, type “control” in the search box that opens and click on the ‘Control Panel App’ option from the search results.
- Step 2: On the control panel window, click on the drop-down arrow of ‘View by’ to select the ‘Category’ option.
- Step 3: Then, simply click on the ‘Uninstall a Program’ link under ‘Programs’ category.
- Step 4: Next, you’ve to select the ‘Microsoft Office 365’ program and right-click on it. In doing so, a contextual menu will appear and from it, click on the ‘Uninstall’ option.
- Step 5: Following that, go to the official website of Office 365 and there, click on the ‘Sign in’ link to sign in to MS Office.
- Step 6: Once you get access to MS Office suite, look for ‘Install Office’ option to click on the same.
- Step 7: In addition, click on the ‘Office 365 apps’ also to again download Office 365 on your respective computer device.
- Step 8: Now, when the Office 365 file gets downloaded, you need to simply open it to install via following the on-screen instructions.
In doing so, the process of ‘reinstalling office’ completes and you can reopen Outlook application to check whether doing so help you resolve the Outlook cannot connect to server issue, or not.
Solution 11: Repair the Corrupted PST File of Outlook
On top of everything, when PST files –where all your Outlook data is stored, become too large and corrupted, in that situation also Outlook can throw such errors at you.
So, you can follow these below given steps and repair the corrupt PST file of Outlook to make sure Outlook connects with the server, again.
- Step 1: Press ‘Windows Logo + E’ keys together on your keyboard to open the ‘File Explorer’ window in front of you.
- Step 2: Inside, file explorer, type ‘SCANPST’ in the search bar to simply locate it.
- Step 3: Once you’re able to find the SCANPST program, you need to double-click on it.
- Step 4: In doing so, Microsoft Outlook Inbox Repair Tool window will appear on the screen and on the same, you’ve to click on the ‘Browse’ option to simply choose the “.pst file” for repairing.
- Step 5: Once you’ve done that, click on ‘Repair’ to simply fix the damaged .pst file of your Outlook program.
Solution 12: Check for the IMAP Server Port
In addition, it is worth mentioning that, if you’re especially encountering ‘Unable to Connect to IMAP Server’ error in Outlook then, it may be because of the incorrect IMAP server port details.
By this, we mean to say that you require correct IMAP server port details to establish a stable and strong enough connection between Outlook and the IMAP server.
Therefore, we suggest you to check for the IMAP server port and, follow these steps to put the correct IMAP server port value in case if required—
- Step 1: In Outlook, click on the ‘File’ tab first.
- Step 2: Then, navigate to ‘Info> Account and Social Networking Settings> Account Settings.’
- Step 3: On the Outlook’s account settings window, select your email account and simply click on ‘Change’ option for the same.
- Step 4: Now, under the ‘Advanced’ tab, what all you have to do is set the IMAP to 143 and 993 for Non-SSL and SSL, respectively.
- Step 5: Once done, just click on the ‘OK’ button to conclude.
Now, check if Outlook connects to the IMAP server or not. If not, there’s also one more solution to this particular issue that you can try next.
Solution 13: Enable Outgoing Server
Similarly, to establish a secure connection of Outlook with the IMAP server, you need to make sure that the outgoing server—which is primarily responsible for the delivery of emails from one client to another and back, must be enabled.
However, if it is not enabled in your case, you can follow the below steps to enable Outgoing server and to resolve ‘Unable to connect to IMAP server’ issue of Outlook—
- Step 1: To enable outgoing server, begin by opening MS Outlook on your system.
- Step 2: Then, click on ‘File’ tab from the navigation pane.
- Step 3: In doing so, the file menu will appear in front of you. From the same, select ‘Info’ first and then, ‘Account and Social Networking Settings’ to simply click on ‘Account Settings’ under the same option.
- Step 4: Now, on the account settings window, select your email account and click on ‘Change.’
- Step 5: Following that, click on ‘More Settings’ option under ‘Add Account’ section.
- Step 6: There on the more settings window, tick the checkbox under the ‘Outgoing Server’ section and in the end, don’t forget to click on ‘OK.’
Once you’re done, check if you can now connect Outlook to the IMAP server.
Solution 14: Repair Outlook
If none of the above solutions works in your case then, thankfully, Microsoft Outlook is capable of repairing itself in case of such issues. So, if the ‘Outlook cannot connect to Server’ error still prevails in your case, you can consider repairing Outlook using these steps—
- Step 1: First of all, ensure closing all the ‘Office Programs.’
- Step 2: Once done, go to the ‘Control Panel’ and there, select the ‘Uninstall a Program’ link under the ‘Programs’ section.
- Step 3: Following that, what you need to do is simply scroll through the program list and right-click on ‘Microsoft Office Installation.’
- Step 4: As you do so, a contextual menu will appear on the screen and you’ll have to select the ‘Change’ option from it.
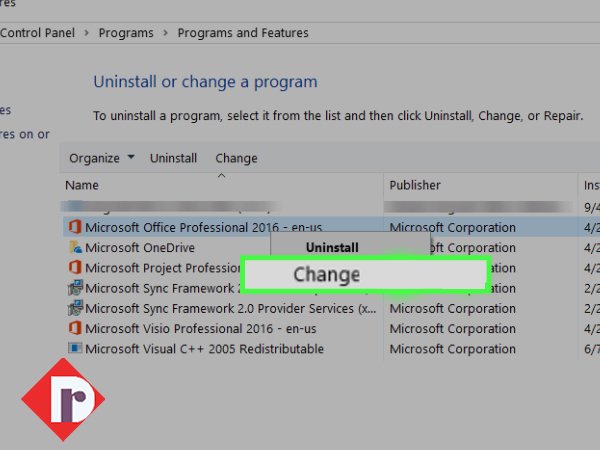
- Step 5: Now, just choose the ‘Online Repair’ radio button and click on the “Repair” option to repair Outlook for smoother functioning.
Alternatively, you can also try repairing Outlook via these steps—
- Step 1: Launch the Outlook program.
- Step 2: Click on its ‘File’ tab.
- Step 3: Then, select the ‘Account and Social Networking Settings’ option.
- Step 4: Next, you’ve to click on ‘Account Settings.’
- Step 5: In doing so, you’ll be taken to the ‘Settings’ window. There, select your account and click on the ‘Repair’ icon located under the ‘Email’ tab.
Upon doing so, you need to confirm your action that you’re doing it intentionally. However, remember that, if you’re not repairing Outlook from the default account then, it probably asks you to enter the ‘Password’ also which is associated with your account.
So, confirm your action and once you do so, Outlook will start the repair process.
The Bottom Line
This ‘Outlook cannot connect to the Server’ is a temporary error that users encounter in Outlook and can be easily resolved with different troubleshooting measures like we’ve already mentioned above in this post. So, that’s all! Hopefully the given solutions are enough to help you fix the server connectivity issue of Outlook.
Next, you can consider reading: Handful of Solutions to Try When Outlook Is Not Working on iPhone |iPad!