Albeit SBCGlobal email is one of the most accessible and popular platforms that offers its service with all sorts of amazing features such as a flexible attachment option, a brilliant security and a large storage space, etc. But, when it comes to smooth working, it might give you headaches. SBCGlobal like other email services, has a frequent nature of encountering webmail login issues and thus, being fed up of the same, its users prefer configuring their account in desktop-email client platforms and many have already configured their account in Microsoft administered Outlook.
Wondering why MS Outlook? Well, wrapped up in a simple and easy-to-use interface, Outlook is one-best-kind of a desktop-email client program that delivers excellent inbox organizational tools, unlimited storage, and offers opportunity to configure as well as manage more than one email service on the platform.
So, considering that, if you’re also one of those who’ve been experiencing issues while accessing your SBCGlobal email account on its webmail platform and like others want to add your SBCGlobal account on Outlook to avoid webmail issues, then this unique guide is all what you need. Here, you’ll first get an overview of steps for “How to Add SBCGlobal in Outlook” and then, the detailed instructions of how to execute each and every step to “Setup SBCGlobal email account in MS Outlook.”
Also read: A Guide to Set-up and Configure ATT Email on MS Outlook’s All Versions
However, right before you start, have a look at the following four requirements that you need to fulfill in advance for adding up your SBCGlobal email account on MS Outlook platform—
- To avoid any interruption in the configuration process, connect your computer with a strong and stable network connection.
- To make sure that you correctly configure your SBCGlobal email account in MS Outlook, jot down all the correct information such as username, email address, and password that are associated with your SBCGlobal account.
- To ensure that no third-party software will interfere in the configuration process, run your MS Outlook program in “Safe Window Mode.”
- To avoid any loss of your SBCGlobal email account’s data in the configuration process, perform a back-up of your account.
And, once you meet these requirements, you’re all set to execute the configuration setup process of your SBCGlobal email account in MS Outlook. So, now, without any further delay, let’s get started with the SBCGlobal email setup guide that first includes an overview of steps and then, detailed instructions for executing those steps. Have a look—
Overview of Steps about How to Add SBCGlobal in Outlook
| Step 1: Launch MS Outlook program on your computer. | |
| Step 2: Go to File Section. | |
| Step 3: Select Account Settings Drop-down Box. | |
| Step 4: Choose Account Settings option. | |
| Step 5: Click New option to run add account setup. | |
| Step 6: Select Manual Setup or Additional Server Type | |
| Step 7: Choose POP or IMAP: Connect to a POP or IMAP Email Account. | |
| Step 8: Enter Details Associated with Your SBCGlobal account and Server Settings of SBCGlobal for Outlook— | |
SBCGlobal Outlook Email Settings: (Incoming Mail Server) | |
| Account Type | IMAP/ POP |
| Incoming Mail Hostname for (IMAP) | imap.mail.att.net |
| Incoming Mail Hostname for (POP) | inbound.att.net |
| Incoming Mail Server Port for (IMAP) | 993 |
| Incoming Mail Server Port for (POP) | 995 |
| Required Encrypted Connection | YES [SSL] |
| Authentication Required | YES [SBCGlobal Account’s Username, Email Address, and Password] |
SBCGlobal Outlook Email Setting: (Outgoing Mail Server) | |
| Account Type | SMTP |
| Outgoing Mail SMTP Hostname for (IMAP) | smtp.mail.att.net |
| Outgoing Mail SMTP Hostname for (POP) | outbound.att.net |
| Outgoing Mail SMTP port for (IMAP & POP) | 465 |
| Required Encrypted Connection | YES [TLS/SSL] |
| Authentication Required | YES [SBCGlobal Account’s Username, Email Address, and Password] |
| Step 9: Go to the More Settings link. | |
| Step 10: Click on Outgoing Server Tab to select the first-two available options. | |
| Step 11: Navigate on Advanced Tab to input Server Ports Numbers of SBCGlobal Service. | |
| Step 12: Hit the OK button to return on the previous page. | |
| Step 13: Click on Test Account Settings option. | |
| Step 14: Just click Finish to complete the setup process. | |
Detailed Instructions on How to Configure SBCGlobal in Outlook
Instruction for Step 1: Launch MS Outlook program on your computer
- Press ‘Windows Logo key,’ type ‘Outlook’ in the Windows start menu’s search bar and click on the “MS Outlook” icon from the available search result.
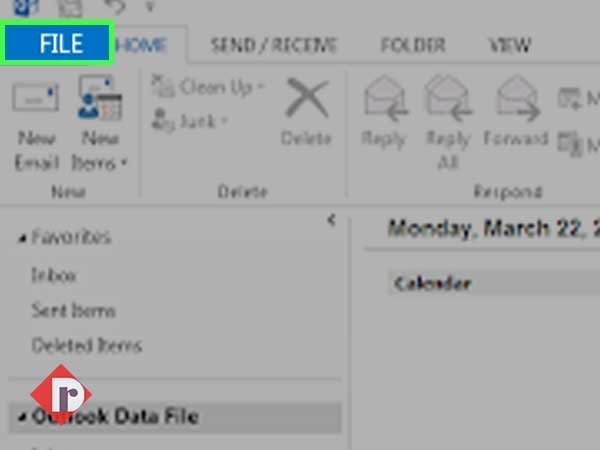
Instruction for Step 2: Go to File Section.
- Once MS Outlook launches, click on its ‘File’ option which is there at the top-left corner of the screen.
Instruction for Step 3: Select Account Settings Drop-down Box.
- In doing so, the file’s menu will appear and from the same, click on the ‘Account Settings drop-down box’ option.
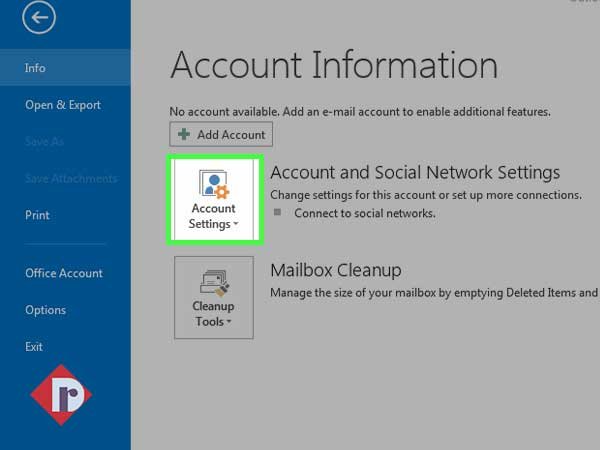
Instruction for Step 4: Choose Account Settings option.
- Then, select ‘Account Settings [Add and remove accounts or change existing connection settings]’ option from the two-available options of drop-down menu.
![Select ‘Account Settings [Add and remove accounts or change existing connection settings]’ option](https://www.datarecovo.com/wp-content/uploads/2021/03/3-1.jpg)
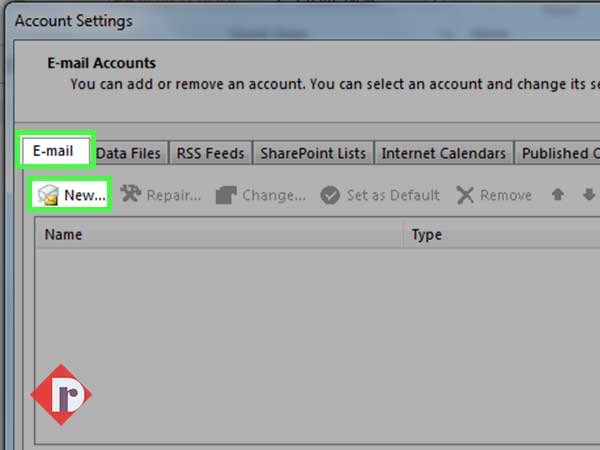
Instruction for Step 5: Click New option to run add account setup.
- This will open an ‘Email Account Settings’ wizard box in front of you and inside it, click on the “New” tab to run add account setup.
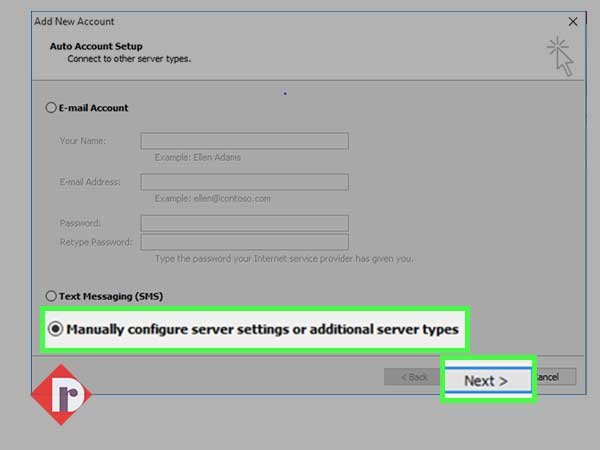
Instruction for Step 6: Select Manual Setup or Additional Server Type
- After that, another wizard box named ‘Add New Account’ will appear on the screen. From it, select the “Manual Setup or Additional Server Type” option and click on the ‘Next’ button to move further on the ‘Choose Service’ page.
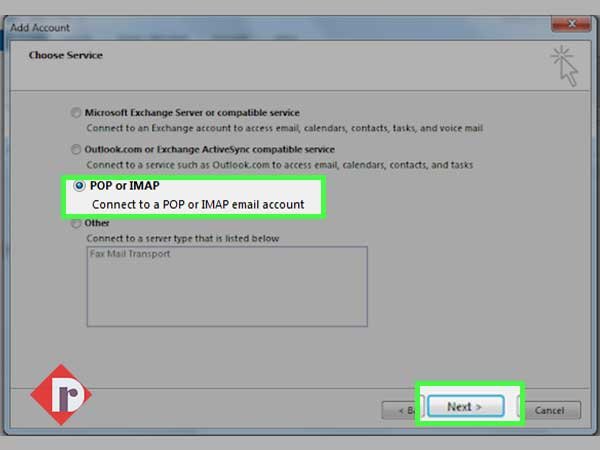
Instruction for Step 7: Choose POP or IMAP: Connect to a POP or IMAP Email Account.
- On this choose service page, click on the radio button of “POP or IMAP: Connect to a POP or IMAP email account” option and simultaneously hit the ‘Next’ button.
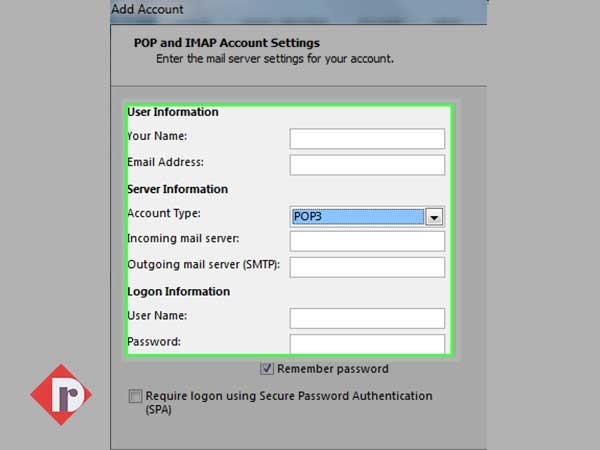
Instruction for Step 8: Enter Details Associated with Your SBCGlobal Account and Server Settings of SBCGlobal for Outlook.
- Now, on the ‘POP and IMAP server settings’ page, enter the following asked information of your SBCGlobal email account in these three sections—
| User Information | Server Information | Logon Information |
- In ‘User Information’ enter:
- Your Full Name
- Your SBCGlobal Email Address
- In ‘Server Information’ first choose either [IMAP] or [POP] from the ‘Account Type’s drop-down menu’ and then, enter:
- Incoming E-mail Server as [imap.mail.att.net] and Outgoing Email Server as [smtp.mail.att.net]—if selected IMAP Account type. Or,
- Incoming E-mail Server as [inbound.att.net] and Outgoing Email Server as [outbound.att.net] —if selected POP Account type.
- In ‘Logon Information’ enter:
- Your SBCGlobal Account’s Username
- Your SBCGlobal Account’s Password
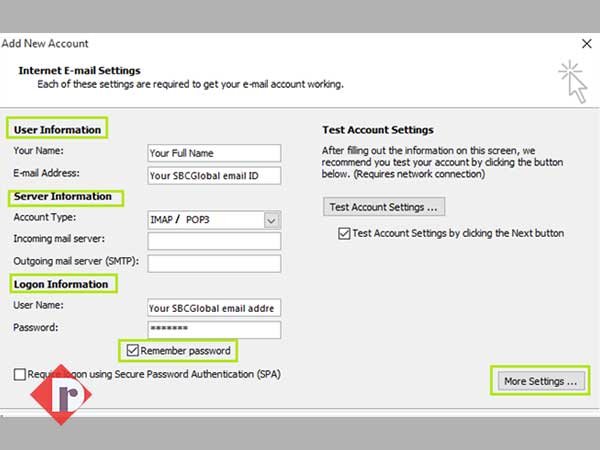
Instruction for Step 9: Go to the More Settings link.
- As you finish inputting the SBCGlobal email settings for Outlook, hit the “More Settings” link to navigate onto the other-half of the POP and IMAP server settings page.
Instruction for Step 10: Click on Outgoing Server Tab to select the first-two available options.
- Here, you’ve to enter the Internet-settings of SBCGlobal email service. To start with, select the ‘Outgoing Server’ tab and simply tick-mark these two-checkboxes—
- [My outgoing server (SMTP) requires authentication]
- [Use the same settings as my incoming mail server]
![Open the ‘Outgoing Server’ tab and tick-mark [My outgoing server (SMTP) requires authentication] & [Use the same settings as my incoming mail server]](https://www.datarecovo.com/wp-content/uploads/2021/03/9.jpg)
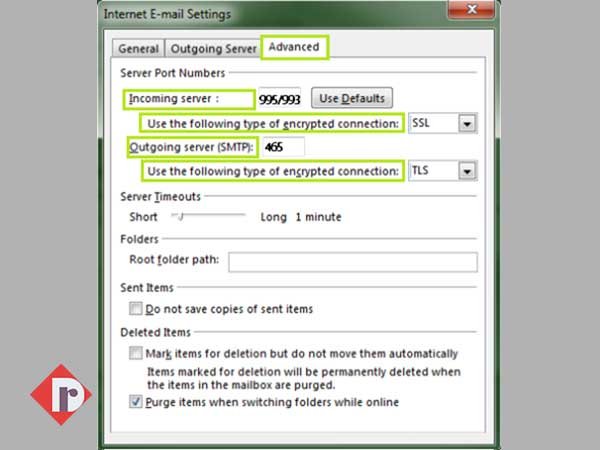
Instruction for Step 11: Navigate on Advanced Tab to input Server Ports Numbers of SBCGlobal Service
- After that, go to the ‘Advanced’ tab and enter the server port details of SBCGlobal service in the “Incoming and Outgoing” sections—
- In “Incoming Server” enter [993] if selected IMAP and [995] if selected POP. Then, click the “Use the following type of encrypted connection” to select [SSL] from the drop-down menu.
- In “Outgoing Server” enter [465] regardless of your account-type selection and choose [TLS] if available otherwise [SSL] only from the drop-down menu of “Use the following type of encrypted connection.”
Instruction for Step 12: Hit the OK button to return on the previous page
- Once you’re done entering the above-mentioned details, click on the ‘OK’ button to return to the previous page.
Instruction for Step 13: Click on Test Account Settings option
- There, choose the “Test Account Settings” option and hit the ‘Next’ button to receive the ‘Test is Completed Successfully’ message for ensuring that you’ve correctly configured your SBCGlobal email account in Outlook.

Instruction for Step 14: Just click Finish to complete the setup process
- Now, as you receive the message indicating that configuration of your SBCGlobal mailbox in Outlook has been done; click on the ‘Finish’ button to finally close the SBCGlobal configuration setup process in Outlook email-client program.

That’s all! This is the complete configuration process of adding SBCGlobal in the Outlook email client using ‘SBCGlobal Server settings for Outlook.’ If you execute them correctly and in the same given order, then you can easily setup SBCGlobal email account in MS Outlook.
In addition to this post, you can also consider reading:
Troubleshoot SBCGlobal Email Not Working in MS Outlook with These 7 Workable Solutions
or,
Look Here for Solutions to Fix SBCGlobal Email Not Working with MS Outlook